If there are no transactions there wont be anything to keep track of. Accounting cycle is the sequence of accounting procedures to record classify and summarize accounting information.
 The Eight Steps Of The Accounting Cycle Accounting Cycle Bookkeeping Business Accounting
Post transactions to the ledger.

What are the steps of the accounting cycle. Here analyzed transactions are recorded in the primary book of accounts as debit and credit in chronological order. Use the steps that help you stay organized and maintain accurate records. Accounting Cycle also known as accounting process or Book-keeping Process is the start-to-end process to be followed sequentially or at times simultaneously for recording the financial and accounting events occurring in any organization.
How many steps are in the accounting cycle. Here are the 9 main steps in the traditional accounting cycle. Identify business events analyze these transactions and record them as journal entries.
You may learn more about basic accounting here. Prepare an unadjusted trial balance from the general ledger. These include analyzing sales purchases and other business transactions and then recording those transactions in the monetary term into the key important areas like journal entries ledger accounts trial balance and then.
Purchase Book Sales Book Purchase Return Book Sales Return Book Note Receivable Book Note Payable Book are the primary book of Transaction recording. Analyze and record transactions. If you want to know about the accounting process just read the following.
This includes any company purchases that were made paying off debts debts acquired or revenue acquired from sales. Steps of the accounting cycle. Some have eight nine steps or even ten steps.
The first step in the accounting cycle is a transaction that takes place. The accounting cycle is a nine-step process businesses use to compile all of the information needed to prepare important financial statements. Step-1 of accounting cycle is identification of business transactions The first step of the accounting cycle beings with the identification of financial transaction that have occurred in the business.
Entering transactions manipulating the transactions through the accounting cycle closing the books at the end of the accounting period and then starting the entire cycle again for the next accounting period. An accounting cycle starts when a business transaction takes place. The accounting cycle is the holistic process of recording and processing all financial transactions of a company from when the transaction occurs to its representation on the financial statements Three Financial Statements The three financial statements are the income statement the balance sheet and the statement of cash flows.
Its called a cycle because the accounting workflow is circular. Thus Accounting Cycle includes. In earlier times these steps were followed manually and sequentially by an accountant.
1 Classify transactions 2 Journalizing them 3 Post to Ledger 4 Unadjusted Trial Balance 5 Adjusting Entries 6 Adjusted Trial Balance 7 Financial Statements 8 Closing Entries 9 Closing Trial Balance 10 Recording Reversing Entries. 10 Steps of Accounting Cycle are. What are the steps of the accounting cycle.
The Accounting Cycle Steps in Proper Order. The six steps of the accounting cycle. First separate your business transactions from all of the transactions you made.
For simplicitys sake were going to divide it into six steps. Usually there are eight steps in accounting cycle processes. The entitys financial statements are produced through analyzing and recordings the business transactions in many different steps of the accounting cycle.
The process of accounting is done stepwise in a cycle called the Accounting Cycle. The following accounting cycle steps can help you keep financial records. The key steps in the eight-step accounting cycle include recording journal entries posting to the general ledger calculating trial balances making adjusting entries and creating financial.
Accordingly an accounting cycle has the following nine basic steps. The Accounting Cycle is a Nine-Step process. Starting the cycle again for the next accounting period.
Identifying transactions recording transactions in a journal posting the unadjusted trial balance the worksheet adjusting journal. Prepare an unadjusted trial balance. Processing classifying and adjusting the business transactions through the accounting cycle.
These events are the starting point from which the rest of the accounting cycle will follow. Closing books of accounts at the end of an accounting period and. It covers everything from analyzing measuring and recording transactions to adjusting balances and closing the books.
Below are the major steps involved in the accounting cycle. Here we discuss the top 9 steps in the accounting cycle with diagram Collection of Data Journalizing Ledger Accounts Unadjusted Trial Balance Performing Adjusting Entries Adjusted Trial Balance Creating Financial Statements Closing the Books and Post-closing Trial Balance. There are lots of variations of the accounting cycle.
Companies will have many transactions throughout their accounting cycle. Accounting is the process of analyzing and monitoring all the financial transactions of the company. However you can add or subtract certain steps when necessary.
The 2 nd step of the accounting cycle is Journalizing. Post journal entries to applicable T-accounts or ledger accounts. The eight steps of the accounting cycle are as follows.
In this episode we show you how to master the clone stamp tool in Photoshop. Cloning in Photoshop - Sampling To remove items seamlessly and convincingly you need to take your samples for cloning from areas directly surrounding the item you wish to remove.
 How To Use Clone Stamp Tool In Photoshop Cs6 Youtube
The Importance of the Clone Stamp Tool.
Using clone tool in photoshop. Using the clone stamp tool designers and creators of all levels of proficiency can copy and hide objects using pixels with ease. Clone only a specific portion of the photo by using a new layer. To use the Clone Stamp tool click and hold the rubber stamp icon in the toolbox and select Clone Stamp Tool in the flyout menu.
While its activated the icon is blue. Open an image File ext jpg png bmp and apply the Clone Stamp tool from toolbox. The simplest method for replacing image content is to paint with one of the Clone tools.
Clone Stamp acts more like a correction tool for images. How to Use the Photoshop Clone Tool. I did the cover image with it.
Open an image in Photoshop. The distance between the two points is adjustable and you must take care to keep from repeating the same information as you brush along. You can use this tool to correct any flaws in the image.
We waited in the blazing sun outside the East Portal of Colorados Moffat Tunnel at. Alt-click a spot in the new layer and then select the layer that you want cloned. Finally it is time to learn how to use the Photoshop Clone Tool.
If you cant see the tool bar on the left make it visible using the Window menu. Work along with me and practice using the Clone Stamp. Today we show you how to remove anything from a photo with the Clone Stamp Tool in Photoshop.
Click on the keyboards S key. In general the Clone tools that are found in the Tools panel. The Clone Stamp Tool is one of the most important Tools that Photoshop has to offer.
You can paint over an unsightly spot or blemish using a similar sample from another part of the image. You can adjust the brush size and shape opacity flow and blending modes in the tool options bar at the top of the workspace. Firstly access the Clone Stamp.
Click on Tools all the way down in the menu. Use the Lasso Tool Quick Selection Tool or the Magic Wand Tool to select an area of the photo. You can find the clone stamp in the tool bar on the left hand side.
The Clone tool Figure 3-29 basically uses two points. Position the cursor over the area where you want to paint the cloned pixels and then start painting. Its very useful in retouching photos.
1 st of all you need to select Clone Stamp Tool and after that you are required to position the cursor over the area which you need to clone. To sample from another area tap the Sample Source tool again and then. The shortcut for the clone stamp for both Mac OS and Windows is S.
Follow along and learn how to setup the Clone Stamp Tool to. Tap the Sample Source tool to activate it. One point reads the image information and the other point writes that information.
This will keep in with the general look and feel of the image and make the alterations invisible. With the Clone Stamp tool selected position the cursor over the area you want to clone and then Alt-click Windows or Option-click Mac to define the clone source. This is how you tell Photoshop where to copy image detail from when you use the Clone Stamp.
Adjusting the Clone tool brush size adjusts the size of the read and write points. You can take a piece of the background for instance of a tree and clone stamps it in front of the tree. Where to Find the Clone Stamp Tool in Photoshop.
It allows you to copy areas of an image and i very useful for getting rid of Distractions or Skin blemishes. Using a combination of components and steps featuring a destination a source and a brush you too can master the clone stamp tool. How to Use the Clone Stamp Tool in Photoshop.
The Clone Stamp Tool can also be used for removing any portion from the imageYou can also learn about How to Rasterize Text on Photoshop. The Photoshop clone stamp tool simply allows you to duplicate a picture or even just a part of an image. In Photoshop the clone stamp tool is used to sample a part of an image and then use that sample to paint over another section of an image.
Press Ctrl-C to copy the selection and Ctrl-V to paste that selection into a new layer. Continuous clicking might even hide the tree from the front and show just the background in the image because of the clone stamp. With the tool active tap on an area of the image you want to copy.
Steps to Use the Clone Stamp Tool in Photoshop Step 1. Note the cross hair at the original sampled area. The Clone Tool or Stamp was the first tool I ever used in Photoshop Elements 20.
A small crosshair appears as you are retouching to show you where the detail is being copied from. Now you can use the Clone Stamp to brush over the area you want to retouch. To access the Clone Stamp use the keyboard shortcut S or select it from the toolbar.
In order to use Clone Stamp Tool you need to follow these steps. The simplest method for replacing image content is to paint with one of the Clone tools. In summer 2006 I had exactly one frame of film left in my camera oops and no more in the bag.
Wednesday February 17 2021.
CompAEB then press the button. In some cases you likewise attain not discover the.
 How To Set The Photo Quality In Your Canon Rebel Dslr Camera
CompAEB then press the button.
Canon rebel t3 settings. Canon Rebel T3 Manual Settingscourierb font size 12 format This is likewise one of the factors by obtaining the soft documents of this canon rebel t3 manual settings by online. Mooses Cheat Cards for the Canon Rebel T3i and the EOS 600D. 3 fps continuous shooting Live View shooting and High- Definition HD movie shooting.
Httpamznto1TmxrtvOptional T3i Battery Grip. 10 Add to Cart. CHEAT CARDS FOR THE Canon T3i.
Mooses Cheat Cards for the Canon Rebel T3 and the EOS 1100D. Adjust the focus for your specific zoom and then leave both focus and zoom alone if you have a zoom lens. 222x147 Sensor photo detectors.
Turn the to set the AEB amount. Control setting is placed in layout of what camera in its class commonly set. Turn the to set the AEB amount.
After the display shuts off you can turn it. Turning off the Shooting Settings display. Set the LCD viewfinder to 10x zoom mode and live-view on.
To browse and select a particular quality setting simply use the arrows again to flip through each one of them and when you make a choice press Set again. Choosing a Resolution Setting. That will lock that setting in and youll be ready to begin shooting.
CHEAT CARDS FOR THE Canon T3 1100D 18-55mm Lens. You might not require more grow old to spend to go to the books creation as without difficulty as search for them. 122 effective megapixels DIGIC 4 high-precision and high-speed 9-point AF approx.
The Rebel T3i DSLR allows for three video recording modes Full HD and HD in a 169 aspect ratio and Standard Definition SD in a 43 aspect ratio all at selectable frame rates. Links to Buy Canon T3i and Accessories in VideoCanon T3i w18-55 Lens and Accessory Kit. Includes 24 Cheat Cards in PDF format for the Canon T3 1100D and the 18-55mm.
Introduction The EOS REBEL T31100D is a high-performance digital single-lens reflex camera featuring a fine-detail CMOS sensor with approx. Press the to set the exposure compensation amount. Under the tab select Expo.
The display appears automatically when you turn on the camera. If AEB is combined with exposure compensation AEB will be applied centering on the exposure compensation amount. CHEAT CARDS FOR THE Canon T3i 600D 18-55mm Lens.
To turn off the display before the automatic. 10 Add to Cart. To navigate the menus on the back LCD screen you should press the Q button on.
Canon EOS T3i Order Info - httpgooglMUJVvBThe Canon EOS Rebel T3i AKA Canon D600 is an awesome DSLR camera. CHEAT CARDS FOR THE Canon T3i 600D 18-135mm Lens. Shooting Settings for a Canon EOS Rebel T3 Series Camera.
In this section Ill discuss what each of the quality settings in the Canon Rebel T3i mean. If AEB is combined with exposure compensation AEB will be applied centering on the exposure compensation amount. I was taking pictures outside in bright sunlight.
The camera was on during the switch which ive never done - i always turn it off first. This is aimed to give ease for user to operate especially for those who had camera before. You will be able to see bright celestial objects and adjust focus on one quite accurately even at high optical zoom levels such as 200mm.
The Canon Rebel T3i allows you to adjust the level of color saturation in your photos in most of the. My 55mm was attached and I changed lenses to the 100mm macro. Includes 24 Cheat Cards in PDF format for the Canon T3i 600D and the 18-55mm.
Canon EOS Rebel T3 Full Specifications. Its affordably priced for a DSLR and. Under the tab select Expo.
Canon EOS Rebel T3 with 18-55mm IS II lens REBEL T3 BLACK 44929 Canon EOS Rebel T3 with 18-55mm and 75-300mm lenses 5157b002k2 Canon EOS Rebel T3 with 18-55mm DC III lens 5157b004. CHEAT CARDS FOR THE Canon T3 1100D 24mm f28 Lens. When shooting Full HD video the Rebel T3i digitally provides additional zoom power without sacrificing quality.
Turning on the Shooting Settings display. CMOS Image sensor format. Its really rather simple so read on below.
Canon EOS Rebel T3 does job very good by giving deep sculpted handgrip and clearance between it and lenses. Also please be aware that if you have another camera from the Canon Rebel series T2i T4i T5i T6i or the T7i most of what I write below will apply to it as well. Press the to set the exposure compensation amount.
Working with quick control menus Navigating the quick control menus. In todays post Ill cover the steps necessary to reset your Canon Rebel T3i to its factory default settings. I have a new T3i 200 images bought in November that stopped functioning properly today.
CHEAT CARDS FOR THE Canon.
1 3 2 3 22 2 5 2 5 23 The midpoint of an interval is the average mean of the endpoints. Riemann sum gives a precise definition of the integral as the limit of a series that is infinite.

This formula is also used for curves and other approximations.

Midpoint riemann sum formula. To estimate the area using this method apply the formula A delta x f x1 f x2. Itll be the function evaluated at the midpoint between the two-- x sub i minus 1 plus x sub i all of that over two and then times delta x. Riemann sums in summation notation.
A midpoint Riemann sum is when each x i x i 1 x i 2 is the midpoint of the subinterval x i 1 x i Lets visualize rectangles in the left right and midpoint Riemann sums for the function f x 1 1 x 2 over the interval 0 5 with a partition of size N 10. 1 n k 1 n z k z k 2 Now you can substitute the value of z k and do a little bit of algebra. In mathematics the Riemann sum is defined as the approximation of an integral by a finite sum.
The approximate value at each midpoint is below. The values of Riemann sum could be given as the sub intervals from top to the bottom right. These will be your inputs x-values for the Riemann sum.
The formula must produce a series of rectangles. For this problem. Now finally lets try to break.
For approximating the area of lines or functions on a graph is a very common application of Riemann Sum formula. Answered Jan 26 20 at 602. For the example function you would have to take values at x 12 32 52 72.
Midpoint Riemann sum approximations are solved using the formula. Z k x k 1 x k 2 k 1 n k n 2 n 2 k n 1 2 n. The sum of all the approximate midpoints values is therefore.
And the desired Riemann sum is. To use the midpoint method you use the x-value in the middle of each interval. The idea of calculating the sum is by dividing the region into the known shapes such as rectangle squares parabolas cubics that form the region that is somewhat similar to the region needed to measure and then adding.
If for all i then S is called the midpoint rule or middle Riemann sum. This calculus video tutorial explains how to use Riemann Sums to approximate the area under the curve using left endpoints right endpoints and the midpoint. Plug the midpoints into the function and then multiply by the interval length which is 025.
M1 1 2 1 3 2 5 4. Learn how to approximate the integral of a function using the Reimann sum approximation. Gives several examples of finding Riemann sums.
Reimann sum is an approximation of the area under a curve or betw. The delta xs are the same in every one of these scenarios. The midpoint sum uses the midpoints of the subintervals.
The first two arguments function expression and range can be replaced by a definite integral. The RiemannSum f x x ab method midpoint opts command calculates the midpoint Riemann sum of f x from a to b. Also discusses a little bit how taking the limit will give the actual area.
This video estimates the area under a quadratic function using 5 midpoint rectangles. If f x i sup f x i 1 x i displaystyle fx_isup fx_i-1x_i that is the supremum of f over x i 1 x i displaystyle x_i-1x_i then S is defined to be an upper Riemann sum or upper Darboux sum. And the right sum.
F2125025 f2375025 f2625025 f2875025 f3125025 f3375025 f3625025 f3875025. Describes what a Riemann sum is. It was named after the German mathematician Riemann in 19 th century.
Defining integrals with Riemann sums. The left Riemann sum uses the left endpoints to find the height of the rectangle. Midpoint Riemann sum is one of the methods in estimating the area under a curve in a given interval a b.
The most common application of Riemann sum is considered in finding the areas of lines. S P n f z 1 z n k 1 n f z k x k x k 1 which equals. Each rectangles area is calculated by adding the base or interval width by the value of the function at one point for each interval.
Where is the number of subintervals and is the function evaluated at the midpoint. M2 1 2 3 2 2 7 4.
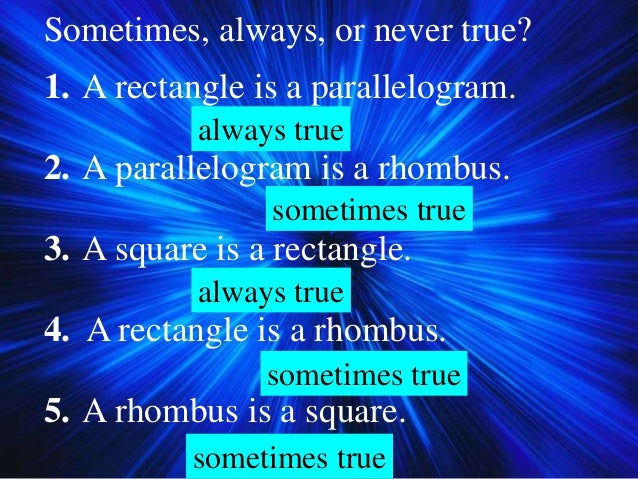
A rhombus is a square. In a rhombus both pairs of opposite sides are congruent.
How Is A Parallelogram With Diagonal Perpendicular Rhombus By The Vector Method Quora
The diagonals of lengths p and q are the red dotted line segments.
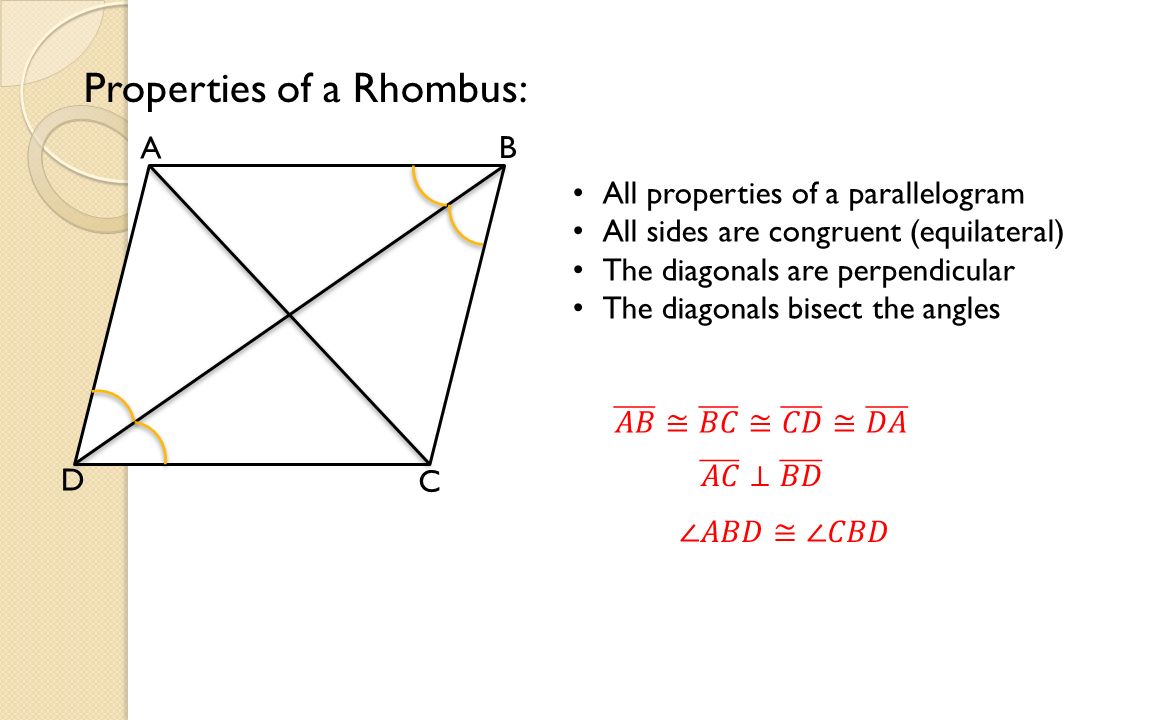
Are the diagonals of a rhombus perpendicular. What Ive worked out so far is that if we take both diagonals as vectors they are perpendicular if their scalar product is equal to zero. Prove that the diagonals of a rhombus are perpendicular bisectors of each other. Example 2 Show that the diagonals of a rhombus are perpendicular to each other.
The diagonals of a rhombus are perpendicular. The diagonals of a rhombus are always perpendicular. 1487819 17k 339k 1443 Using analytical geometry prove that the diagonals of a rhombus are perpendicular to each other.
As a parallelogram the rhombus has all the properties of a parallelogram. We can follow the same procedure to prove that the diagonals of a rhombus are perpendicular to each other. The diagonals of a rectangle are equal.
Diagonals of a rhombus are perpendicular. In a rhombus the diagonals bisect each other. - the opposite sides are of equal length.
In particular diagonals of a parallelogram intersect each other at a point that divides each diagonal in half. C The longer diagonal of a rhombus is. - the opposite sides are parallel.
Rhombus ABCD To prove. Each angle marked with a black dot is a right angle. The diagonals of a trapezoid are SOMETIMES equal.
Prove that the diagonals of a rhombus are perpendicular bisectors of each other. The diagonals of a rectangle are ALWAYS equal. Therefore rhombus has all the properties of parallelogram.
In this post we will prove that the diagonals of a rhombus are perpendicular to each other. Get an answer to your question Which property is always true for a rhombus but not always true for a parallelogram. A rhombus is a parallelogram with four congruent sides.
A quadrilateral is rhombus if the opposite sides are parallel opposite acute and obtuse angles are equal and four equal sides. Sal proves that the diagonals of a rhombus are perpendicular and that they intersect at the midpoints of both. If this were the case it would be a square which technically can be classified as a rhombus.
- the diagonals bisect each other. Diagonals of a Rhombus are Perpendicular to Each Other We have shown that in a rhombus the diagonals bisect the angles using triangle congruency. Rhombus is a parallelogram with all sides equal to each other.
The line segment jointing the opposite vertices is known as diagonal. Let me remind you that a rhombus is a parallelogram which has all the sides of the same length. Since the diagonals of a rhombus are perpendicular these outside angles must be complementary angles.
Diagonals of a rhombus are equal and perpendicular to each other. Since ABCD is a rhombus AB BC CD DA In AOB and COB OA OC OB OB AB CB AOB COB AOB COB Since AC is a line AOB COB 180 AOB AOB 180 2 AOB 180 AOB 180 2 90 From 1 COB AOB COB 90 Also DOC AOB 90 AOD COB 90 Since DOC AOB AOD COB 90 AC BD The diagonals of a rhombus are perpendicular to each other. The height h is the perpendicular distance between any two non-adjacent sides which equals the diameter of the circle inscribed.
The diagonals of a trapezoid are equal. Every rhombus is a kite and any quadrilateral that is both a kite and parallelogram is a rhombus. Prove that the diagonals of a rhombus are perpendicular This exercice is in the vector and scalar product section so I guess the teacher is expecting it to be solved using that subject.
According to the property of rhombus the diagonals of a rhombus are perpendicular bisector of each other. Sometimes never always Weegy. The question is.
This Video Also make notes of the videoPlease do share it with your fellow students. Score 1superxtraordinaryPoints 227 User. Sometimes never always Weegy.
Which attribute is not always true for a rhombus. That is if we have parallelogram ABCD with diagonal latex overlineAC and latex overlineBD then latex overlineAC is perpendicular to latex overlineBD.
Anything that derives from an animal. Eggs from chicken ostrich duck turkey goose quail and others are prohibited for a vegan.
 What Vegans Can T And Can Eat A List Of Foods Substitutes The Green Loot
Vegans cant eat any foods made from animals including.

What can t vegans eat. If you feel sorry for vegans unable to enjoy creamy cheesy flavours and textures then you can stop right now. Thats obvious and easy. Here is a simple list of foods that vegans dont eat and reasons why.
Were sorry to say that there are hidden animal products lurking in lots of things you may not have thought of. Foods that vegans eat Avoiding animal products doesnt. For this reason vegans avoid eating foods of animal origin such as.
A vegan diet excludes animals and their byproducts. You will probably find most people arent vegans for more than a couple years citing resulting health issues while there are thousands of vegetarians out there who havent eaten flesh in decades and are still perfectly healthy. Vegans dont eat food that are derived from or created by animals.
Tofu seitan lentil meatloaf coconut bacon. While your researching what vegans cant eat also look into how long people stay vegan vs. That said a quick internet search will reveal vegan versions of these and many other gelatin-containing foods.
What CANT vegans eat. Beef pork lamb and other red meat. So if you typically slice berries and banana into Greek yogurt.
One gray area is palm oil. What You Cant Eat. All nuts and seeds are okay to eat on a vegan diet and include almonds cashews walnuts pistachios macadamias sunflower seeds pumpkin seeds chia seeds flax seeds.
Most of the commercially made corn bread mixes include lard during its preparation and this is where it always suggested for the vegetarians to check the labelling before making its purchase. Vegans avoid meat chicken fish shellfish eggs dairy and honey as well as any other products containing animal-derived additives. But what about foods that seem to be vegetarian but actually arent.
Also allowed and encouraged in vegan diets are other fermented products like miso kimchi and sauerkraut. What do vegans dont eat is easier to answer than what do they eat. You can eat almost any fat on a vegan diet such as extra virgin olive oil coconut oil and avocado oil.
Red meat beef lamb goat bison etc Poultry chicken and turkey Pork pig Insectsbugs. List of foods vegetarians cant eat Corn bread mixes. Meat fish dairy eggs honey and other ingredients.
Chicken turkey goose duck quail etc. Beef lamb pork veal horse organ meat wild meat etc. Vegans typically dont eat the following.
Cashew cream isnt some pricey obscure ingredient. You should avoid any product made with gelatin. Vegans do not eat any part of an animal nor do they eat anything that comes from an animal.
Smart vegans know that the soft flavour and richness of cream can be magically re-created using cashew cream. Or animal bones organs hides or other animal by-products Whole eggs and egg products like mayonnaise. If youre a vegetarian you know to stay away from meat poultry and fish at the very least and vegans also avoid eggs and dairy.
While palm oil doesnt come from an animal source many vegans are concerned about how areas are deforested in order to plant palm oil plantations leading to habitat loss for millions of animals. Fish or shellfish such as crabs clams and. This is because they do not support the process of animal harm and torture that is often used in the production process also for environmental purposes and some even for health reasons and thus any animal consumption does not align with their morals.
Any type of meat of any animal. Myth 1 Vegans cant eat creamy sauces. On a vegan diet all dairy foods are eliminated including milk cheese butter yogurt cream buttermilk and foods made from them.
The easier question to answer is not what can vegans eat but rather what cant they. Chicken duck and other poultry. The flesh of animals fish seafood or other living creatures.
Vegans also do not eat products that contain animal-derived ingredients even in small amounts. That means that vegans do not eat meat poultry fish eggs milk or other dairy products or honey.
It also showed users found the fairway. CLUB MENS AVERAGE DISTANCE WOMENS AVERAGE DISTANCE.
 Smart Distance Learn How Far You Hit The Ball Arccos Golf
The median 3-wood goes 18689 yards 7-iron clocks in at 13348 yards and pitching wedge at a 7397 mark.

Average yardage for golf clubs. 218 - 226 yds. A 4-iron goes an average 120 yards so a 4 hybrid will go 125-128. 129 - 134 yds.
This table shows how far the average golfer generally hits with each club when he or she makes solid contact. 184 - 191 yds. As you can see in the numbers above there is quite a significant difference between the distances of the average golfer and the scratch golfer.
151 - 157 yds. A 3-iron goes an average of 130 yards so the hybrid will go 135. Golf 101s golf ladies Golf Stats golf swing tips.
Amateurs usually average between 190 to 205 yards with their drivers. 230 - 239 yds. 201 - 208 yds.
The median driving distance is 21955 yards while the average for a three-wood is 18689 yards a seven iron 13348 yards and pitching wedge 7397 yards. At its core the median driving distance is 21955 yards. For example you might think that you are hitting your 7-iron 155 yards.
About 25-30 yards or 2-3 clubs. 140 yards is the average distance for a female golfer using a wood. Most golfers miss greens on the short side because of this which I explored more in this article.
According to independent sources PGA pros hit their drivers ranging from 280 to 320 yards on average. 163 - 169 yds. The best way to find out is to hit about 50 balls with each club.
Youll typically pull that club on the course from that distance but in reality you might be hitting it 145 yards. LPGA pros hit 230 to 270 yards on average. What about recreational golfers the average driving range here is between 1 95 and 205 yards.
Five handicaps and below average 240 yards 6-12 handicaps average 220 yards 13-20 handicaps average 204 yards and 21 and overs average 187 yards. Heres an interesting fact. Driving distance figures from the RA and USGAs most recent Distance Report show that the average hit by an amateur male club golfer is 215 yards.
192 - 199 yds. 3 Wood Vs 5 Wood Distance. 2018 Driving Distance Report.
The 5-iron and 5-hybrid ranges are 150 to 200 yards for men and 115 to 160 yards for women while the 6-iron or 6-hybrid ranges are 140 to 190 yards for men and 110 to 150 yards for women. This figure combines a 3-wood and 5-wood which are the two most popular woods used in golf. Kinda like this guy.
Eliminate the longest five and the shortest five and then figure out the middle of the remaining group. So what does all this information mean. As for LPGA Tour professionals the range is between 230 and 270 yards.
For example you might see 10-12 yards between each short iron 12-15 between middle irons etc Knowing these figures is another critical factor in club selection. Most golfers get 10 yards overall difference between clubs but others get 12 yards overall difference between clubsI have worked with a few touring pros who get 14 yards overall between irons with their normal swing this means you would need to use 7 yards for each 12 difference in club length and 7 yards for each 4 difference in loft angle. 12 17 Degrees Distance.
In general a golfer can expect to get 5 to 8 yards more with a hybrid than that numbered iron it replaced. 20 23 Degrees Distance. Once your average yardages become clear you should notice a consistent difference in distances between clubs.
Thats your average yardage. Initially you may be thinking oh i just need to swing the club faster. PGA Tour professionals achieve an average driving distance between 280 and 320 yards.
140 - 145 yds. The rest of this article will tell you how to work out the distance you hit each club. 173 - 180 yds.
Other club distances of note. The average distance when using a wood is 220 yards. 150 yards consider a hybrid instead 5-iron.
While PGA Tour pros hit their drives anywhere from 280 yards to 320 yards on average and LPGA Tour pros hit their drives from 230 to 270 yards on average most recreational golfers according to Golf Digest average somewhere around 195-205 yards with their drivers. 274 - 284 yds.
You can also configure Gmail in Outlook by. Add your Gmail account via Add Account then click on Manual setup or additional server types.
 Gmail In Outlook 2016
At this moment i managed to get the scanning working by using smtp server of Gmail.
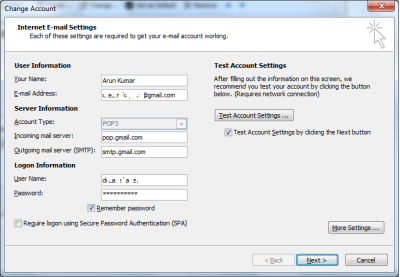
How to setup gmail on outlook. To set up a Gmail account in Microsoft Outlook 2007. On the Account Information page click on Add Account. From Gmail open Settings and navigate to Forwarding and POPIMAP.
Scroll to IMAP access and make sure Enable IMAP is checked. Prepare Your Gmail AccountBefore you connect your Gmail account to Outlook you must prepare your Gmail. How to Use Gmail With Microsoft Outlook Step One.
How to Add a Gmail Account to Outlook 365. Connect Outlook To Your Gmail Account. Next select Forwarding and POPIMAP tab then enable the IMAP option.
If you have previously enabled 2-factor authentication for Gmail youll be prompted to enter the code. Methods to Configure Gmail in Outlook. Log in to the Gmail account and click the gear icon on the top-right corner.
The below-mentioned method will help Sync Gmail with Outlook. If you are not using 2-factor authentication on your Gmail account. Select the E-mail tab then select New.
Select Internet E-mail and then click Next. Allow Less Secure Apps to Access Your Gmail Account. Enable IMAP and save your changes.
Just click on Next. Click the Gear icon and head to Settings. Click the File tab at the top-left of the Outlook window.
Select File Add Account. Go to the gear icon in the top right corner then choose Settings. Click enable IMAP and then click Save Changes.
But before setting Gmail with Outlook make sure IMAPPOP is enabled in your Gmail account. Click the New button above the email address thats. Under Account Settings choose the E-mail tab and click on New Enter in all of your gmail account information make sure there is no check next to Manually configure server You do not have to go through these extra steps.
Enter your username email address and log in information. Enter the password and select Sign in. Log into your Gmail account.
Check the box beside Manually configure server settings or additional server types then select Next. Before you add your Gmail account to Outlook youll need to adjust some security settings to let Outlook see your Gmail. Adding Gmail to Outlook if You Already Have Another Email Account in Outlook.
Im trying to setup this printer to scan documents and send it from an Office 365 mailbox. I have both Enabled. Itll be in the Microsoft Office folder in the Start menu.
Adding Gmail to Outlook 2020 1 Open Microsoft Outlook 2010 on your computer. Set up Gmail To Connect With Microsoft Outlook Log into your Gmail Account. Select the Account Settings button then click Account Settings from the dropdown menu.
How to Add Your Gmail Account to Outlook Using IMAP Set Up Your Gmail Account to Use IMAP. Click Settings and then select Forwarding POPIMAP to open the POPIMAP settings. Enter your email address and click Connect.
Manually Configure Outlook for Gmail Back at the account setup screen select Manually configure server settings or additional server types and click Next. Outlook will ask you for an email address to set up. To setup your Gmail account to use IMAP sign in to your Gmail account and go to.
If youre adding your Gmail account as a second account in Outlook carry on. Click on the Gear icon and select Settings. Open Outlook 2016 and select File.
Outlook will launch a Gmail window that asks for your password. - You can use either IMAP or POP3 in email client to access your Gmail account. Click on the Forwarding and POPIMAP tab.
Select Tools Account Settings from the menu in Outlook. Click on the File tab in the top-left corner. Click on Forwarding and POPIMAP on the links given above your Inbox.
First sign in to your Gmail account using valid credentials.
How to Change and Record Voicemail Greetings on iPhone. Tap the voicemail icon at the bottom right of the screen its the one that looks like an old-fashioned cassette tape.
 Set Up Visual Voicemail On Your Iphone Apple Support
Tap Set Up Now.

How to change voicemail on iphone. Turning voicemail on or off is generally quite straightforward as you just need to dial a special number on your phone. Navigate to your Phone app located at the bottom of your iPhone home screen. Step 1 Turn on your iPhone by holding down the Power button at the top of the iPhone.
This option allows iOS users to manage and scan all their messages as a list. Scroll down and tap Phone. Tap-open the Phone app.
How to set up voicemail on iPhone. Go into your iPhone dialer and access the voicemail features. Instead just tap your voicemail icon to see all your voicemails as a list on your screen.
Tap Change Voicemail Password. You will see a menu bar appear at the bottom of your screen. You will be taken to the screen.
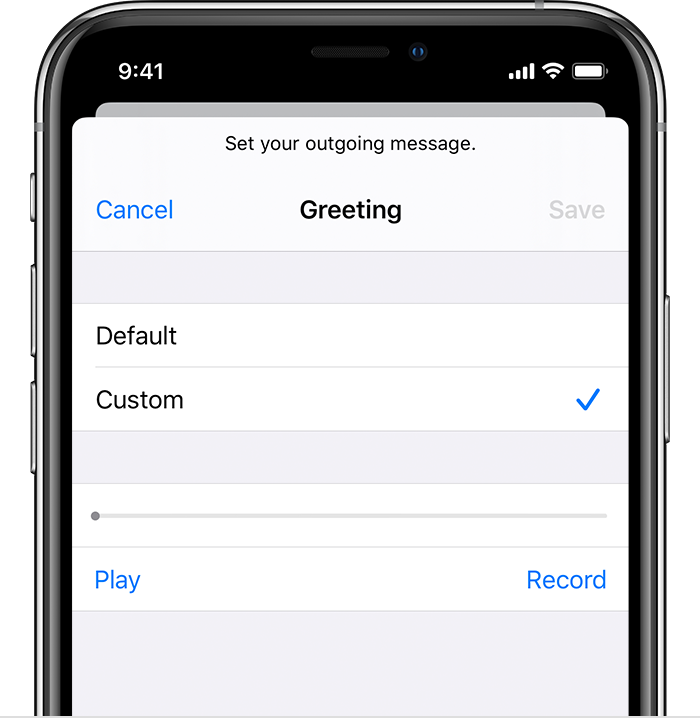
Go to the Phone app then tap the Voicemail tab. To transfer your existing voicemail follow these steps. Record a custom greeting or use the default greeting then tap Save.
Next tap on the Voicemail tab in the bottom right of the screen. Set a custom iPhone voicemail greeting. Change your iPhone voicemail greeting using the Phone app on your device.
Enter the new four or six-digit passcode. Some network providers also let you do so via their mobile app. Tap the Voicemail button in the bottom-right corner.
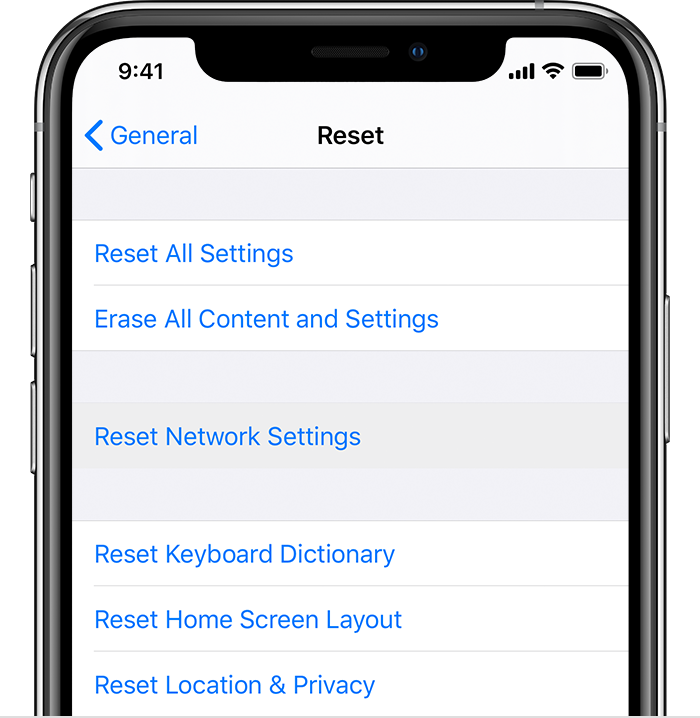
If you ever need to reset your password you can do so in your Settings. Enter your password then tap done. No more calling up - with visual voicemail you dont have to call a number to get your messages and you dont have to listen to them in order.
Open the Settings app on your iPhone. Scroll down and tap Phone. At the bottom tap Voicemail on the menu bar.
Keep your PIN secret so your mailbox is secure. Even if you dont use the iPhone for calls very often this is a great thing to do since you may end up sending more. If using an eSIM with a second line select a line eg Primary Secondary 888-888-8888 etc then proceed to step 3.
On the other hand Apple users have the choice to activate a visual voicemail on their iPhones instead of the regular call divert. How to change your voicemail passcode Open the Settings app on your iPhone. Once this screen has appeared all of your old voice.
How to Change Your iPhone Voicemail Greeting Message Step 1. Voicemail greetings are easy to create and can help leave a positive impression on callers. Tap the Phone icon on your home screen to launch your devices phone calling app.
The Phone app is the one with the. However it is only available if you have updated your software to the latest iOS and EE carrier settings. Tap Custom to record a greeting.
Re-enter the passcode Tap Done. Additionally you may reset your voicemail password from the Settings app. Go to the Settings app Phone Change Voicemail Password.
Step 2 On the lower right corner tap on the voicemail button. How to change your voice mail message in outgoing messages on your iPhone iOS 9 or laterTap the phone icon the same one you use to call. In this way you can change the 9-digit voicemail number by following easy steps.
Step 1 Open the app on your phone. Greeting is located in the top-left corner of the screen. Tap Greeting in.
You can change the 9-digit voicemail number from the default number that is assigned to the iPhone. Tap Voicemail then tap Greeting upper-left. Visual voicemail is a way to scan and manage your voicemails on your iPhone screen.
Tap the Phone app icon to enter the phone application. Tap Change Voicemail Password. In this article we will run you through a step-by-step guide which will show you how to change and manage your voicemail greeting no matter what phone or app you use.
Scroll down to the item Phone This option has a green icon with a picture of a traditional phone to the left of it. With Vodafone you dial 1211 to turn on your voicemail or 1210 to turn it. Once you have done that you will see a voicemail logo the bottom right corner of the window that has opened select that voicemail icon.
Open your iPhones Settings app which is the gray gear icon on the home screen. Tap the Phone icon on the home screen. On your home screen tap Phone.
This action will lead you to the voicemail menu on the iPhone and it will dial the. That action will open the. Enabled when a checkmark is present.
To change your voicemail message on iPhone.
There are six important properties of a parallelogram. Parallelogram definition a quadrilateral having both pairs of opposite sides parallel to each other.
 Ch 6 Quadrilaterals
FAQ dont send me links or anything just.
What is always true about a parallelogram. If the measure of an exterior angle of a regular polygon is 45 then the polygon is a decagon. In Euclidean geometry a parallelogram is a simple quadrilateral with two pairs of parallel sides. A parallelogram is defined as a four sided figure quadrilateral whose opposite.
2 Opposite angels are congruent. This is sometimes true. The diagonals of a parallelogram bisect each other.
This is always true. It is always true that a parallelogram. Opposite angles are congruent.
Creatividad No siempre es fácil generar esas ideas de negocios necesarias para poder emprender. Two consecutive sides are Which description does NOT guarantee that a trapezoid is isosceles. 4The diagonals are congruent.
3 Consecutive angles are supplementary. Get your answers by asking now. A trapezoid is a quadrilateral.
Each diagonal of a parallelogram separates it into two congruent triangles. It is true when the parallelogram has 4 right angles. Trapezoids must have 4 sides so they must always be quadrilaterals.
Answer by ewatrrr 23315 Show Source. Of the statements given the one that is not always true about a parallelogram is that the diagonals are congruent. Of the statements given the one that is not always true.
Here is an example when a parallelogram is a rectangle. 1 DAE BCE 2 DEC BEA 3 AC DB 4 DE EB 2 Which statement is not always true about a parallelogram. A line through D drawn parallel.
The diagonals bisect each other is wrong. 4 The opposite sides are parallel. Opposite angles are congruent.
Triangle ACDcong triangle ABC If we have a parallelogram where all sides are congruent then we have what is called a rhombus. By comparison a quadrilat. Here is an example when a parallelogram is not a rectangle.
Mathematics 21062019 1430. Choose all that apply. 2 The opposite sides are congruent.
Which phrase does not describe a mineral. 9th - 12th grade. The diagonals are congruent 3 0.
Confirmed by jeifunk 4212014 90955 PM Get an answer. All ______ are rectangles A. None of the above Which term makes this sentence true.
Opposite angels of a parallelogram are congruent and the Consecutive angles are always supplementary which means the consecutive angles are added up to 180. Consecutive angles are supplementary. Which statement is not true about a parallelogram.
Which statement is sometimes but not always true. Which statement about a parallelogram is not always true. The opposite or facing sides of a parallelogram are of equal length and the opposite angles of a parallelogram are of equal measure.
A square is always a rhombus. Join Yahoo Answers and get 100 points today. Sum of exterior angles of a parallelogram Home.
It is not true when a parallelogram has no right angles. A parallelogram is sometimes a kite. The diagonals of a parallelogram bisect each other.
A trapezoid is defined as a quadrilateral that contains one pair of parallel sides. What is not always true about a parallelogram. A parallelogram with sides of equal length is called a rhombus.
Which expression is not always true. The properties of parallelograms can be applied on rhombi. The congruence of opposite sides and opposite angles is a direct consequence of the Euclidean parallel postulate and neither condition can be proven without appealing to the Euclidean parallel postulate or one of its equivalent formulations.
Motivación La motivación es un factor importante al emprender un negocio tanto para el emprendedor como para la gente que colabora con el en su proyecto en esta sección presentaremos diferentes materiales para ayudar a impulsar esa parte. True a parallelogram always has opposite side equal No Comment. How do you find the height of a parallelogram.
If mSTR 106 which of the following statements is trueA. Ask Question 100. Is 8 less than half the second number.
Emprendedores Motivación Creatividad Social y más. Is a four-sided shape a quadrilateral has opposite sides that are parallel to each other and of the same length has opposite internal angles that equal one. Which statement is not always true about a parallelogram.
Which statement is not always true about a parallelogram. A parallelogram is a rectangle. In geometry a parallelogram is a two-dimensional four-sided shape such that opposite sides have the same length and are parallel and opposite angles have the same measure.
Which of the following is always true about a haiku. 4 The opposite sides are parallel. 1 The diagonals are congruent.
3 The opposite angles are congruent. Perimeter 2 12 cm 6 cm 2 18 cm 36 cm. 3 Which statement is true about every.
By the definition of a parallelogram we know that the opposite sides are congruent and parallel so the second and fourth statements are always true. 1 Opposite sides are congruent. Cnot all parallelograms are rectangles.
Opposite sides are congruent.
The reactant that is all used up is called the limiting reactant - it sets a limit on how much product can form. Calculate the mole ratio from the.
 How To Find Limiting Reactant Quick Easy Examples Practice Problems Practice Questions Youtube
Limiting reactant Use the atomic masses of Ag and S to determine the number of moles of each present.

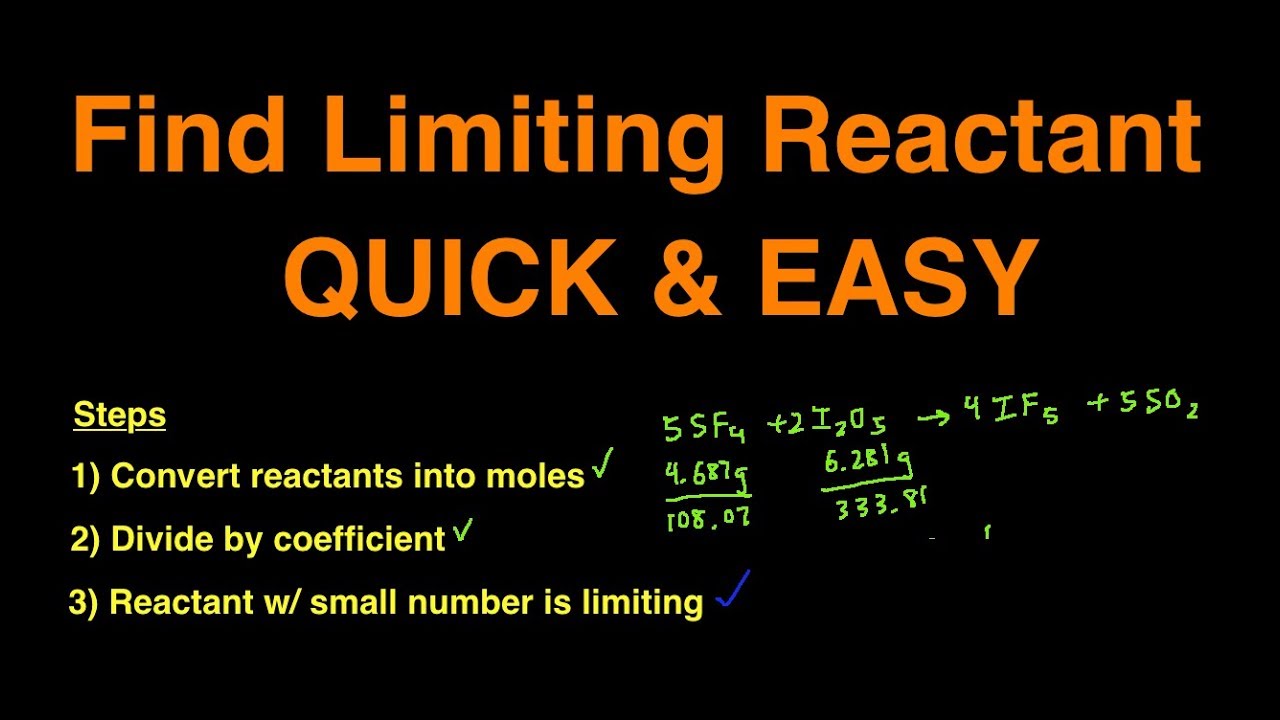
How to determine limiting reactant. A value less than the ratio means the top reactant is the limiting reactant. In this case if we react 100 of Na2CO3 which is 005000 mol how much of HCl is required. The reactant that yields the smallest mass of product is the limiting reactant.
Dont waste good thought. The reactant that forms the least amount of product will be the limiting reactant. Compare this result to the actual number of moles of sulfur present.
The reactant which is in a lesser amount than is required by stoichiometry is the. Limiting reactant in a reaction is found by calculating the amount of product produced by each reactant. The reactant that is left over is described as being in excess.
Calculate the yield of each reactant. Enter any known value for each reactant the limiting reagent will be highlighted. The first is to compare the actual mole ratio of the reactants to the mole ratio of the balanced chemical equation.
In this example you are beginning with 9 times as much oxygen as glucose when measured by number of moles. To determine which reactant is the limiting reactant first determine how much product would be formed by each reactant if all the reactant was consumed. If we divide our moles of H 2 into moles of N 2 our value will tell us which reactant will come up short.
The reactant that is all used up is called the limiting reactant the reactant that is left over is described as being in excess The mass of product formed in a reaction depends upon the mass of the. Identify the excess reagent. If youre seeing this message it means were having trouble loading external resources on our website.
The other method is to calculate the gram masses of the product resulting from each reactant. Based on the calculation we need 01000 mol of HCl to react with 100 of Na2CO3 but we only have 008000 mol of HCl. This chemistry tutorial covers how to find the limiting reagent when given amounts of different reactants and how to calculate the theoretical yield using th.
Compare the two ratios you calculated to identify the limiting reactant. There are two methods used to find the limiting reactant. When there are only two reactants write the balanced chemical equation and check the amount of reactant B required to.
Any value greater than the above ratio means the top reactant is in excess to the lower number. Next to determine the limiting reagent we calculate the amount of reactant B required to completely react with all of reactant A. The following points should be considered while attempting to identify the limiting reagent.
So heres the solution. The mass of product. Therefore you have more oxygen than required.
Determine the limiting reagent if 100 g of ammonia and 100 g of oxygen are present at the beginning of the reaction. Learn how to identify the limiting reactant in a chemical reaction and use this information to calculate the theoretical and percent yields for the reaction. Determine which reactant is limiting by dividing the number of moles of each reactant by its stoichiometric coefficient in the balanced chemical equation.
Determine the balanced chemical equation for the chemical reaction. Before doing anything else you must have a balanced reaction equation. Convert all given information into moles most likely through the use of molar mass as a conversion factor.
The reactant that produces the least amount of product is the limiting reactant. Then use the balanced equation to calculate the number of moles of sulfur that would be needed to react with the number of moles of silver present. The formula tells you that your ideal ratio is 6 times as much oxygen as glucose.
How do you find the limiting reactant with ML. How To Calculate Limiting Reagents. Calculate the number of moles of each reactant by multiplying the volume of each solution by its molarity.
Identify the limiting reactant and determine the mass of CO2 that can be produced from the reaction of 250g of C3H8 with 750g of O2. The balanced chemical equation is already.
Then place the reticle on tilled soil blocks and right-click or press the left trigger button on the controller to plant the seeds. How to Use a Seed.
 Can T Plant Seeds On Some Blocks In A Wheat Farm Help Minecraft
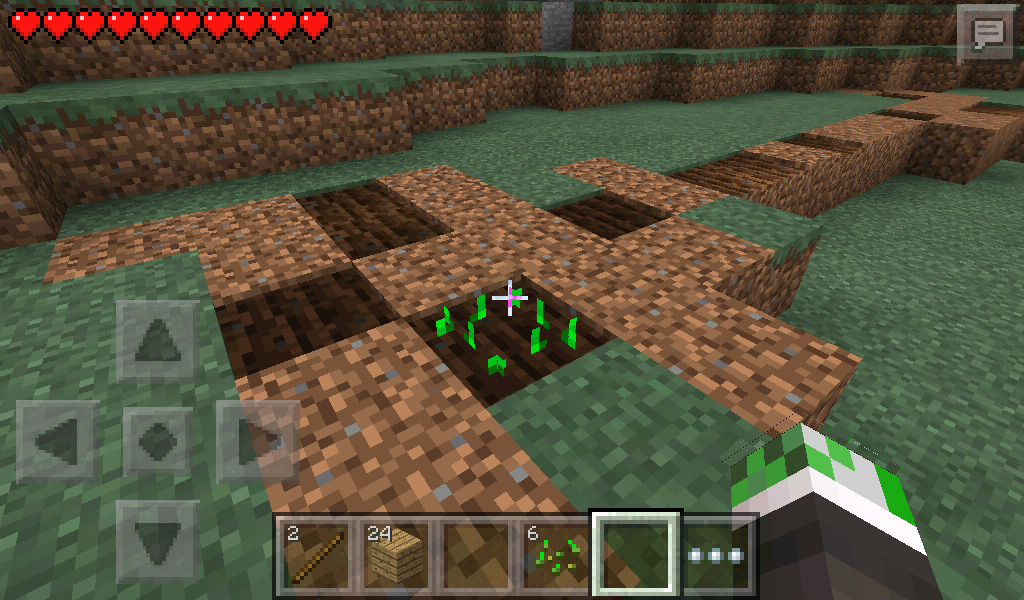
Wheat Seeds Melon Seeds Pumpkin Seeds Beetroot Seeds Seed level generation a string of text used for world generation seed the command which displays the world seed Seeds may also refer to items used as seeds.
How to plant seeds in minecraft. A majority of the time the new sandbox world is great but Minecraft seeds are a great way to. What is a seed. When you create a world in Minecraft you have the option to enter a seed value to be used by the World Generator to create your world.
1 Obtaining 11 Breaking 12 Natural generation 13 Chest loot 14 Crafting 15 Trading 2 Usage 21 Farming 22 Breeding 23 Taming 24 Composting 3 Melon Stem 4 Sounds 5 Data values 51 ID 52 Block data 53 Block states 6 Advancements 7 History 8 Issues 9 Gallery 10 See also 11 References When broken a melon stem drops 03. The wiki has more info. When you spawn into a Minecraft world it uses a seed number to generate well everything.
Now seeds in Minecraft are codes for the world or the map that you interact with within the game. Each Minecraft world is created using a seed in the World Generator. Seeds can help you spawn at a strategic location in a unique Minecraft world.
Another legendary Minecraft seed has been discovered and this one taps into the open world games wider folklore. For a guide to the seeds used to grow wheat and other crops in-game click here. Melon seeds are an item that can be used to grow melon plants.
You can turn a. The cool part is. This Minecraft tutorial explains how to use the seed command with screenshots and step-by-step instructions.
Ive listed what version of Minecraft they will work with. This and the version you use will affect which features can be enabled. Well be listing some coordinates along with each seed so that you can check out some key areas in the various areas of the world.
The seed to the world of Minecrafts fabled Herobrine has been discovered. Whenever you enter the seed for a map the game spawns you in that. Say you absolutely love the Minecraft world that you are exploring but have no idea what seed was used to create the world.
Select Create New World from the Single Player menu Using seeds in Minecraft is easy. After a decade a group of Minecraft researchers have found the Herobrine seed. Using the same generation keys on same versions of Minecraft you will get absolutely identical worlds every time.
Bedrock works with the Windows 10 Nintendo Switch Xbox One and mobile versions. To toggle certain features click on the icons in the features box just above the map. To plant the seeds equip them by placing them in your toolbar and highlighting the toolbar space.
Nether Wart Carrot Potato Sweet Berries Cocoa Beans Melon Seed Projectile a projectile shot by melon golems Corrupted Seeds. However this code or seed is auto-generated in the game and happens every time you spawn in the world of Minecraft. The seed is a phrase word or number that fixes Minecrafts random number generator in a fixed pattern.
Seeds for Minecraft allow you to quickly create a world with the desired parameters. You can set it in the Minecraft world creation options or by default you are given a random one. Below the seed and version you can also choose the Minecraft dimension that you want to view Overworld Nether or End.
The seed tells the game as to what location to spawn you in like a desert or dungeon or grassland. Use a seed to spawn near a particular biome structure or mob. This seed is the core code that builds the world and decides your spawn point in it.
Seeds may refer to. Start by simply opening the game clicking Single Player and then clicking Create New World Note that these instructions are for the single-player mode. Minecraft seeds are the best way to get the blocky worlds you want without having to roll the dice.
We selected only the best and. If youre looking for a specific kind of gameplay whether it is a speedrun or a survival challenge using seed. They are a set of characters that can be entered special field before World creation.
Method 1 of 3. The seed was found last week by andrew_555 aka Kminster who kicked off their search on 5th September 2020. If two maps are made with the same seed they will be identical.
Our list of some of the best Minecraft seeds will give you a bunch of fun starting point options for your next world. Minecraft for Computer 1.
You can assign the same hyperlink to multiple selected cells. Go to Insert Links Hyperlink.
 Where Is The Edit Hyperlinks In Microsoft Excel 2007 2010 2013 2016 2019 And 365
Under Link to click Place in This Document.

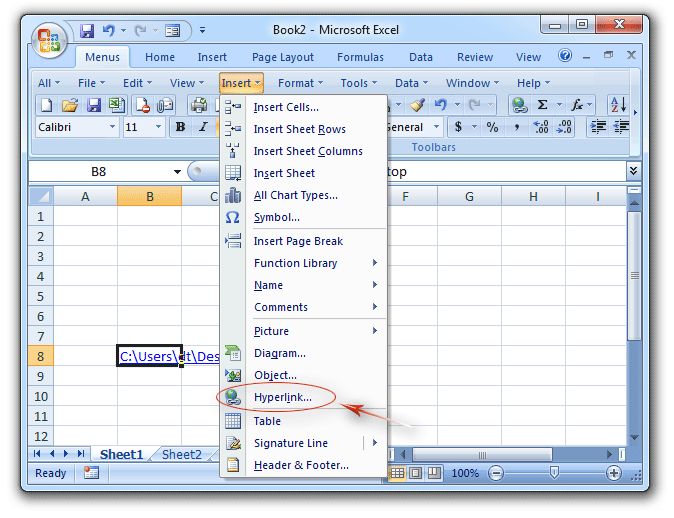
Insert hyperlink in excel. Linking to a different workbook 6. You can insert hyperlinks into your text. Select the cell and under the Insert Tab you can see the Hyperlink button Links group.
Full feature free trial 30-day no credit card required. Linking to URLs 3. For quick access to related information in another file or on a web page you can insert a hyperlink in a worksheet cell.
Keyboard Shortcut is Alt N I 2 Or you may use Ctrl K. Once clicked the links will redirect the. On the Insert tab in the Links group click Link.
Double-click the Excel document in which you want to insert a hyperlink. When you choose to share a workbook some options in Excel are simply not available any more. If you absolutely must add the hyperlink to the workbook the only option is to unshare the workbook add the hyperlink and then again share the workbook.
To insert a hyperlink to a different sheet in the same workbook supply the target sheet name preceded by a pound sign and followed by the exclamation point and target cell reference like this. Links are used in social media posts web pages emails and documents. To create a hyperlink to an existing file select a file use the Look in drop-down list if necessary.
Right-click on the cell and choose the Hyperlink option from the context menu. Choose Place in This Document in the Link to section if your task is to link the cell to a specific location in the same workbook. You can also insert links in specific chart elements.
HYPERLINK Sheet2A1 Sheet2 The above formula creates a hyperlink with the jump text Sheet2 that opens Sheet2 in the current workbook. I think about 95 of the users does not even bother to go to the Insert tab and find the Hyperlink option. Add hyperlink to specific part of cell in Excel 1.
Existing File or Web Page 1. Grab your free exercise file here. Check the Excel Essentials Course.
Step 1 Open an Excel document. In Excel hyperlink is located under Insert Tab. Most of the screen shots in this article were taken in Excel 2016.
How to Insert a Hyperlink. If youre on a Mac dont confuse the Excel Insert. Then click the Underline symbol to turn the underline format off and go to select Automatic in the Font Color.
In the opening Insert Hyperlink dialog box click the Browse for File button in the popping Link to File dialog box find out and select the Word document you will link and then click the OK button. Linking to an email address 4. Go to select the hyperlink cell then select the part of the text you dont need it to be displayed as a hyperlink in.
You can add links to websites other documents or even other cells and sheets within the same spreadsheet if the data in your spreadsheet needs to refer to other sources for backup support or further. Another method to create a hyperlink in a cell in Excel is using the option available on the Excel ribbon bar. The Insert Hyperlink dialog window appears on the screen.
How To Insert And Remove A Hyperlink In Excel Ultimate Guide 1. 2 Click the Hyperlink button in the Links group on the Insert tab or press CtrlK. You can also open a new document by double-clicking the Excel icon and then clicking Blank WorkbookStep 2 Select a cell.
Linking to a cell in the same spreadsheet 5. This is the rare use path. Web pages are interconnected with a network of links.
Kutools for Excels Filename List utility can batch add multiple hyperlinks to all files or one type of files in a certain folder such as create hyperlinks to all workbooks to all word documents to all text files etc. This tab is in the green ribbon at the top of the Excel window. Microsofts Excel is a full-featured spreadsheet application that allows users to organize maintain and analyze various types of data.
Select the cell you will add a hyperlink and then click Insert Hyperlink. Follow these steps to insert a hyperlink to a file or Web site in an Excel 2010 worksheet. Select New from Cell Reference tree to select our New sheet of the same excel file and select Workbook from the Defined Name tree.
Click on it and open Insert Hyperlink Dialog box as the previous process. Kutools for Excel - Includes more than 300 handy tools for Excel. Inserting hyperlinks is one of those options that is removed once the workbook is shared.
This should be a cell into which you want to insert your hyperlinkStep 3 Click Insert. The Insert Hyperlink dialog box appears. Clicking Insert opens a toolbar directly below the green ribbon.
Select a cell where you want to insert a hyperlink. How to remove a hyperlink 7. On the Insert tab click Hyperlink.
1 Select the cell or graphic you want to attach a hyperlink to. How to Insert HYPERLINK in Excel Sheet Select the text cell or picture on which you would like to insert a hyperlink in an excel sheet. You can also right-click the text or picture and select the Excel Hyperlink option.
Pasting the links of the songs into the search bar is another way for uploading the Spotify tracks. And then drag them to the conversion window directly.
 Spotify Adds Ipod Syncing Music Store Looks To Take On Itunes
Launch the Spotify software on your computer.

How to get spotify on ipod nano. Attach your iPod Nano to the computer with USB cable. Launch iTunes and add the downloaded Spotify songs to iTunes library create a playlist and add the Spotify songs to it then sync to iPod Nano through iTunes. Then click Music Sync Music selected playlists.
Select downloaded songs and click Export Export to iPod. Spotify music can only be played inside the app so it requires you do download the Spotify app and the only iPod that can download apps is the iPod Touch. Add Your Favorite Spotify Songs Albums or Playlists.
Open TunesKit and directly drag and drop any music track or playlist or album from the. After that you can get Spotify Music playing on any iPod touch. Find and click the device icon from the top of iTunes.
Here the following guide is to tell you how to put Spotify music on iPod with iTunes. At this moment its not possible to sync your Spotify music with an iPod Nano. Have a nice day.
It is not possible to transfer Spotify music to an iPod nano. In the Playlists section. Transfer DRM-free Spotify Music to iPod Nano with iTunes Step 1.
Eager to sync your Spotify music to iPod for offline listening and enjoy them while running outdoor. Safely remove your. This tutorial will show you how to download Spotify musi.
You only need to select the songs youd like to convert and save. Although there is no Spotify app for iPod nano there is still other ways for you to enjoy Spotify music on iPod nano. Click Erase iPod Sync with Spotify if it appears in the Spotify window.
Plug iPod nano or shuffle into PC via USB cable. Open iTunes and import the downloaded Spotify songs to your iTunes library. Quit iTunes if its running.
06 2018 538 pm Post for Spotify Music Tips. Let me know if you have any other questions. Connect your iPod to the computer with a USB cable.
Plug your iPod into your computer by using the USB cable as usual. Click the icon you should see the iPod show up on the sidebar and the digital media contents which are on the iTunes. Easy Guide to Play Spotify Songs on iPod Nano with Your Free or Premium Account Step 1.
Step 2 Set output format as MP3 or AAC. But you can use iTunes to sync local Spotify to iPod Nano Shuffle and Classic for free. Spotify will automatically identify the connected iPod device.
The only iPod that is supported is the iPod Touch. Open iTunes and add MP3 files via File Add to Library. Launch Spotify Music Converter and Spotify program will be.
After you have opened the iTunes app from your computer desktop please transfer Spotify playlists to iTunes. Connect your iPod with your computer via a USB cable. The iPod Nano and the Spotify files will show up on the.
With the help of DRmare Spotify to iPod Converter you have access to different kinds of Spotify music on iPod Nano. The easiest way is to download Spotify songs to mp3 and them sync them to iPod nano with iTunes. Since Spotify Music is DRM protected we are going to share the best way to download Spotify Music to non-DRM format on the computer and then sync Spotify Music to iPod touch for streaming at this post.
You can easily drag songs albums or playlists. Check out the Spotify system requirements. Launch iTunes app and enter to the top menu to click the File - Add File to Library and select Spotify songs to upload.
Next click LIBRARY find the downloaded songs. All the downloaded Spotify songs are saved to the LIBRARY. Use the USB cable to connect your iPod with computer.
Steps to download and convert Spotify music to iPod. Launch TuneMobie Spotify Music Converter. You can transfer the purchased Spotify Music to iPod via Spotify Appjust connect your iPod with computer with USB cable and launching the Spotify software on computerafter Spotify identifying the connected iPod successfullyjust click the Erase your iPod Sync this iPod with Spotify option to sync already-downloaded music from Spotify to your iPodbut this way may erase the current files on iPod.
Select the favorite Spotify playlists and then. Here is a list of the devices that are supported and which you can use with Spotify. Step 3 Download Spotify music to MP3.
Step 1 Add Spotify songs to TunesKit Spotify Downloader. Select all the converted Spotify songs you like and then click Sync to transfer Spotify playlist to iPod ShuffleNanoClassic. Sync all your music to your iPod.
Come and get started with the first part. To sync music from Spotify to your iPod follow these steps.
2 6 2 2 2 2 2 2 2 2 2 2 2 2 2 2 2 2 2 2 2 4 16. Find all such possible integer combinations absolute value equastions with a null set or empty set answer.
 Multiplying And Dividing With Exponents Math Algebra Exponents Showme
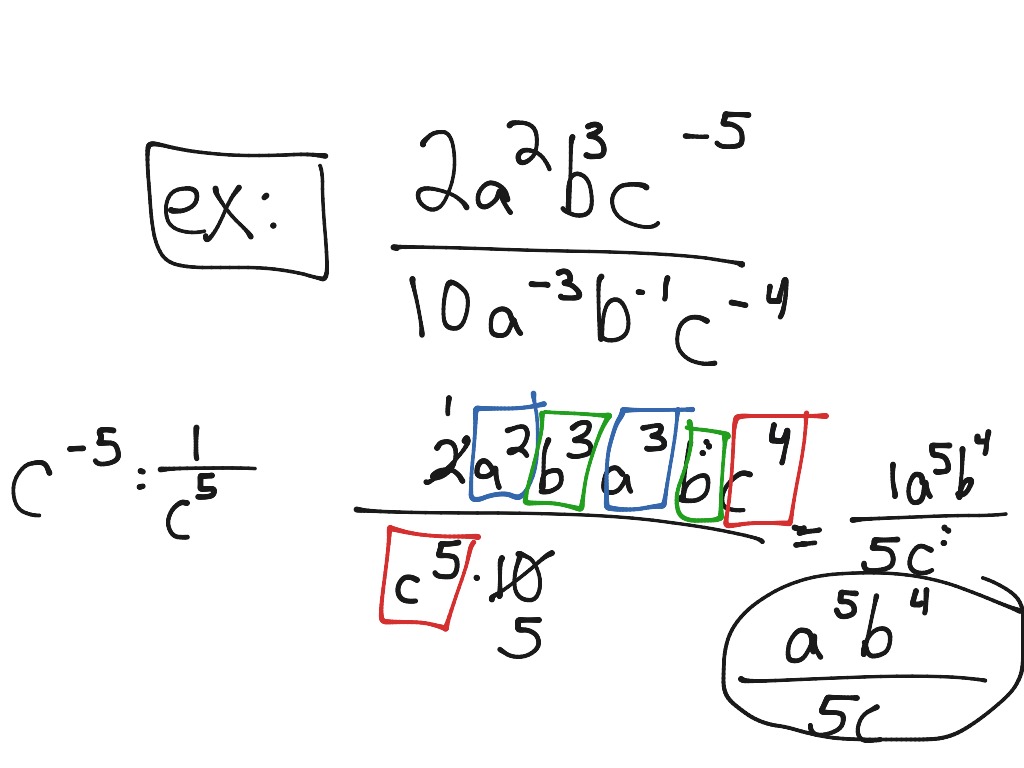
2522 2 5-2 23.

Dividing exponents with variables. 3 4 12 90 c c 7. For example 4 x represents four multiplied by itself x times. Divide the coefficients and divide the variables.
5 8 4 x x 5. 6 2 3 3 36 27 1333. For example if we are given we subtract the exponents 6-24 and we are left with.
It contains plenty of examples and practice problems. When the bases and the exponents are different we have to calculate each exponent and then divide. Dividing Variables With Exponents - Displaying top 8 worksheets found for this concept.
Dividing fractional exponents with different exponents and fractions. 3 32 3 43 3 3 3 3 4 519 432 12. Dividing exponents with different bases.
X n x m x n-m. This final video revises multiplying exponents and then later on gets into. Exponent rules for adding and subtracting integers the sum of the squares of three consecutive odd integers is eleven.
3 3 14 16 xy xy 8. 6 3 2 3 62 3 3 3 333 27. First redistribute the power to the inside of the brackets following the third exponent rule.
A-n a-m a-n--m a m-n. 14 3 2 x x 2. 12 7 35 45 x x 3.
Then flip the 𝑥 variables with negative exponents to their reciprocal. Finally multiply the 𝑥 variables by adding the exponents together. Here is a bigger demonstration involving several variables.
For exponents with the same base we can subtract the exponents. Lets do one more. X 6 y 3 z 2 x 4 y 3 z.
12 -712 -5 12 -7- -5 Notice the 5 now has 2 minus signs. View 43TB gr 10 1pdf from MATH MISC at Rick Hansen Secondary School. X3 y z2 x y2 z2 xxx y zz x yy zz x xx y zz x y y zz xx y x2 y.
Exponents can also be variables. For exponents with the same base we can subtract the exponents. This algebra video tutorial explains how to divide radical expressions with variables and exponents.
Y 2 y 3 yy yyy. When the exponent is 0 we are not multiplying by anything and the answer is just 1 example y 0 1 Multiplying Variables with Exponents. To start either square the equation or move the parentheses first.
When dividing variables with exponents that are factors in a fraction subtract the exponents leaving the remaining base and exponent in the same position numerator or denominator TOPIC EXERCISES Divide and Simplify. X 6-4 y 3-3 z 2-1. Rules for Exponents Completing calculations with exponents requires an understanding of the basic rules that govern their use.
Some of the worksheets for this concept are Exponents and division Dividing with exponent rules Exponent rules practice Exponents es1 Operations with algebraic expressions multiplication of Properties of exponents Dividing radical Dividing radicals period. Just subtract the exponents of the variables we are dividing by. 5 6 25 75 m m 4.
To divide exponents or powers with the same base subtract the exponents. Heres how you do it. A n b m.
X 3 x 2 xxx xx x 3-2 x 1. Dividing variables with exponents. Which makes sense because z 2 z 2 1 To see what is going on write down all the multiplies then cross out the variables that are both top and bottom.
A n b n a b n. Subtracting the powers leads to negative exponents so you can write it as a fraction so that you have positive exponents. The process doesnt change when working with negative exponents.
If you have an expression with multiple variables then you just have to divide the exponents from each identical base to get your final answer. Using the law of exponents you divide the variables by subtracting the powers. A nm b kj.
In mathematics a polynomial is an expression consisting of variables also called indeterminates and coefficients that involves only the operations of addition subtraction multiplication and non-negative integer exponentiation of variables. You just need to pay attention to the signs. 43 Rational Exponents Focus on applying the exponent laws to expressions using rational numbers or variables as.
An example of a polynomial of a single indeterminate x is x 2 4x 7An example in three variables is x 3 2xyz 2 yz 1. To divide exponents with the same base we subtract the bottom exponent from the top exponent. Video About Multiplying and Dividing Exponents.
Divide expressions with multiple variables. When the bases are different and the exponents of a and b are the same we can divide a and b first. This algebra math video tutorial focuses on simplifying exponents with fractions variables and negative exponents including examples involving multiplicati.
We can also look at it like this. To divide exponents that have a common base we subtract the exponents. 28 65 10.
9 7 26 6 x x 6. The zs got completely cancelled out.
Change your iPhone voicemail greeting using the Phone app on your device. Tap Set Up Now.
 Set Up Visual Voicemail On Your Iphone Apple Support
When finished tap Stop.

How to change voicemail on iphone 5. Use your carriers default ringtone. How to reset your voicemail password on an iPhone. If using an eSIM with a second line select a line eg Primary Secondary 888-888-8888 etc then proceed to step 3.
Tap when youre ready to start. Step 1 Open the app on your phone. Hold down the Power button until you see the white Apple logo appear on your iPhones screen.
To transfer your existing voicemail follow these steps. Setting up a new voicemail message is the same on any iPhone that runs iOS 9 or higher. Instead just tap your voicemail icon to see all your voicemails as a list on your screen.
You can now change the number of times that your iPhone rings before a call is sent to voicemail. Set an alert sound for new voice mail. For many users this icon is one of the four permanent apps on the bottom of the screen.
Verify if Voicemail is Set up on your iPhone. Step 2 Tap the Phone app icon to enter the phone application. You can choose which ones to play and delete without listening to all of them.
How to set up voicemail on iPhone. A badge on the Voicemail icon indicates the number of unheard messages. Open the Settings app on your iPhone.
Before we proceed with the means to fix voicemail not working on iPhone it is of prime importance to know if voicemail is set up on the phone on not. Go into your iPhone dialer and access the voicemail features. The Phone app is the one with the white phone icon in a green box.
Voicemail greetings are easy to create and can help leave a positive impression on callers. Reset Network Settings to Fix Voicemail Issue. This how-to guide is for those with the on-screen features enabled.
Use the steps below to set a custom iPhone voicemail message. To change your voicemail message on iPhone. Not all iPhone users have the same voicemail features.
Tap Voicemail then tap Greeting upper-left. Apple was one of the first companies to include Visual Voicemail on its phones starting way back in 2007. No more calling up - with visual voicemail you dont have to call a number to get your messages and you dont have to listen to them in order.
The password must contain 4-7 digits. Hold down the Power button on the top or side of your phone. Tap the Phone icon on your home screen to launch your devices phone calling app.
Record a custom greeting or use the default greeting then tap Save. In the Phone app Visual Voicemail available from select carriers shows a list of your messages. Visual voicemail is a way to scan and manage your voicemails on your iPhone screen.
In this article we will run you through a step-by-step guide which will show you how to change and manage your voicemail greeting no matter what phone or app you use. Voicemail tap tap greeting and then tap Custom. How to record a custom greeting on iPhone.
Check your voicemail on iPhone. How to Change the Voicemail Number on iPhone After you set your personal voicemail greeting your iPhone dials a number to recover or access your voicemail. If you forget your voicemail password theres no way to reset it from your iPhone.
Rather than having to dial into your normal voicemail. Can I change the time iPhones rings before going to voicemail. Enter your password then tap done.
Enabled when a checkmark is present. Tap Custom to record a greeting. Tap on voicemail tap greeting and then tap Default.
How to change your voicemail password. At the bottom tap Voicemail on the menu bar. Slide the slide to power off switch at the top of the screen right.
Scroll down to the item Phone This option has a green icon with a picture of a traditional phone. Greeting is located in the top-left corner of the screen. Use the numeric keypad that appears on your screen.
In this way you can change the 9-digit voicemail number by following easy steps. Go to the Phone app then tap the Voicemail tab. Wait for a minute.
You will see a menu bar appear at the bottom of your screen. Tap Voicemail in the bottom right corner. This is a feature that is controlled by your carrier and you can call them and ask them to change it for you or you can change it yourself.
Beginning with iOS 10 and operative on iPhones dating back to the iPhone 6S you can see both your visual voicemail and a text transcript of the messageVoicemail transcripts take the audio file. On your home screen tap Phone. Some carriers will still have you simply call a number to listen delete skip ahead archive etc.
To re-record repeat steps 2 and 3. Enter a new password. To review touch play.
Also at times some update my change or reset the configuration and cause.
See also The Chord Chart ebook with over 500 chord diagrams. Chart with guitar chords.

Diminished Guitar Chord sheet Unstable chords or chords that you wont be using often while playing.

Guitar neck chord chart. The chart gives an overview over some often used chords in the most common played keys. Place your 3rd finger on the 4th string7th fret. Use your 1st finger to bar the strings on the 5th fret.
F G A B C D E So now we end up with A C and E to play anywhere we like. In the free guitar notes chart pdf youll find several neck notes map. Movable Open Chord Charts In the video I gave you several examples of how positioning different shapes up the neck can harmonise nicely with an open root string 5th or 6th string and open 1st string.
As with your Major Bar Chord you can move this shape up and down the fretboard to achieve different chords. Economical Guitar Triads - An Easy Way to Dominate the Neck Triads are the most basic chords you can play on guitar consisting of just three notes. You might want to also check out the Guitar octave chart too as this will help you to find any notes you need.
Blank Necks Diagrams Chord Boxes Blank Necks Diagrams Chord Boxes Save for Later. Lets just rearrange a little bit. Landscape - 5 across 2 rows 10 total.
Place your 2nd finger on the 3rd string6th fret. Every chord chart that you will see is set up the same way. Only one note differentiates minor chords from major chords.
The guitar chart is printable with adjusted width to fit on an A4 paper for printers with 72 or higher dpi. Here are a few Blank Chord Box Paper PDF files for you to download and print. Now I like to make your time learning guitar as productive as possible.
The basic chord diagram. Our Notes on the guitar neck chart will help you learn all the notes and their positions on your guitar neck check out the Help tab for more info. The vertical lines going up and down represent each of the six guitar strings.
There is nothing more boring to listen to than a guitarist just banging away on the same 4 chords for an entire song. See more ideas about guitar chord chart guitar chords playing guitar. You can also download Notes on the guitar neck chart PDF.
The symbol for a minor chord is the root note followed by a lower case m. Now that you are familiar with the container lets have a look at how a chord would be. Lets have a look at them.
Minor chords sound sad and are the second most common type of chord after major chords. If we want to play an Am chord along with it we can use the same pattern. Dec 27 2018 - Explore Debs board Guitar chord chart on Pinterest.
Place your 4th finger on the 2nd string7th fret. Therefore we only need three strings to play them. The third which.
Blank Chord Diagram PDF. The corresponding chord symbol shows up above the fretboard and the spots of the chord shape will display the according notes or intervals. If you need help with finger placement on your guitar use tablature tab and fingerboard diagrams.
Described and explained in the blog post the notes on the guitar fretboard. This exercise will get you started playing guitar chords up the neck the first step to advanced rhythm guitar. C D E F G A B C uh oh we ran out of letters.
The following guitar chord diagrams represent minor chords. We can have natural notes C D E F G A B notes with sharps like C and D and notes with flats like Bb Db and Eb. C D.
The horizontal lines going left to right are meant to show the frets on your guitar neck. Lets have a look at them. While I would strongly encourage independent exploration of this concept you may find the below charts useful for getting started.
Our free guitar chord chart makes looking up how to play a guitar chord very easy. Practice playing the most common open-position chords on your guitar to get that. How to Read Guitar Chord Charts Diagrams 1.
After entering or changing a chord shape in the fretboard the tone on the lowest string is considered as the root. Minor Guitar Chords Chart. A real chord on the diagram.
Just a bunch of lines. With the button inversions and slash chords you can navigate through the list of the different chord interpretations. This is my go-to chord box paper.
So we now have our three notes C E and G for the C chord that we can play anywhere on the guitar. No letter major maj7 major 7 7 dominant seventh chord m minor m7 minor seventh. Use this cheat sheet to help you get started with your guitar finger placement and guitar chords.
G C Em D is one of the most common chord progressions in all of popular music today. The high E string is the line to the far right and the one on the left is meant to depict the low E string. This chart provides a visual representation of the guitar fretboardfingerboard and shows the corresponding positions of the notes on the guitar neck piano keyboard and in traditional notation.
On the left you can see what a basic chord chart will look like. Learning to play the guitar is a lot fun.
During the 2021 NAMM Show Yamaha unveiled the DGX-670 a new digital piano featuring a modern attractive aesthetic and a simplified user interface. Extensive range of accompaniment patterns for any style of music but also be better prepared to learn and even design new accompaniment patterns for any style or genre of music.
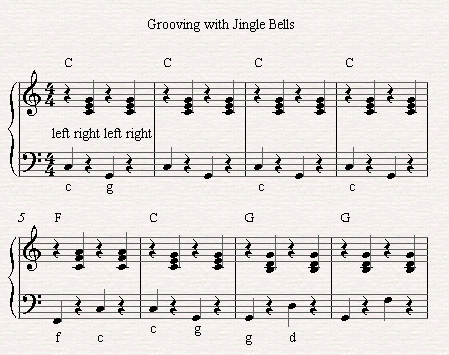
In this comprehensive walk-through Devon highlights the most recycled piano accompaniment techniques in pop music.
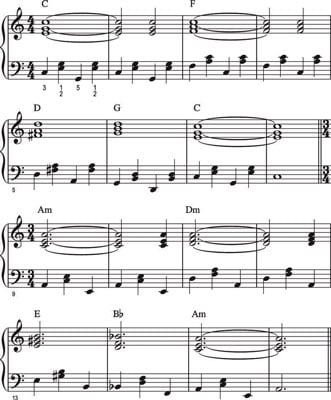
Piano accompaniment rhythm patterns. Want to learn even more rhythm patterns like the heartbeat patternCheckout Piano for SingerSongwriters. In addition to being super informative i. Typically a rhythm pattern can be found in just two to four measures in any piece and includes macrobeats also called pulse beats or big beats microbeats also called meter beats and a section of the melodic rhythm.
The root note and two top notes. To play this pattern break a chord into two units. When you have found 1234 5 pick out 1 3 5 and you have a Major chord.
Rock and Pop Left Hand Patterns and 4. It can be started from any note on the piano. Accompaniment Pattern 7 - Color Broken Chord.
So instead of playing the C and G together rock back and forth between them. Rhythm patterns are the rhythmic road signs in a piece of music. Accompaniment Pattern 8 - Right Hand Color Broken Chord.
I get asked a lot to explain what I do when I do. See lists just below the video Thats because the topic is rhythmic styles or patterns. Jazz Blues and Boogie-Woogie Left Hand Patterns 3.
It features the piano accompaniment techniques commonly used by professionals including. The Tetrachord is simply a pattern of 5 notes. You will be using this handbook constantly for homework and in class.
Accompaniment Pattern 4 - Off Beat. Between 3 4 is a half step. The new Portable Grand ensemble instrument is a full 88-note weighted action keyboard with exceptional playability superb sound and visual appeal making it ideal for beginners and accomplished pianists alike.
Accompaniment Pattern 1 - Off Beat. The left hand is the rhythm and bass let the right hand determine the melody. If you havent explored left hand piano styles and patterns before your students may not understand what you mean and how important they are so one of the best.
Rhythmic patterns - By altering the rhythms of accompaniment one can introduce a variety of musical styles such as blues ballad gospel etc. Accompaniment Pattern 5 - Country Style. Between notes 1 2 is a whole step.
The easiest way to find the inversion that works best is to look for common tones within the chord progression. This handbook is not only about learning how to accompany but also LEARNING HOW TO LEARN. Specifically well invert the 1 chord in both hands to create smoother voice leading.
A piano tutorial on how I make popular piano accompaniment rhythmspatterns sound more full and interesting. Play the root note on beat 1 and the top two notes together on beat 2. I only included 100 left hand patterns but there are so many more patterns you can create.
New Age and Contemporary Left Hand Patterns. In this progression for example the note F is in both chords. Accompaniment Pattern 6 - Broken Chord.
The first step to makeover this accompaniment pattern is to add inversions. Ive got some quick tips to get you to play beautiful arpeggio patterns in no time. Take that left hand beyond standard simple sounding chords with this amazing left hand pattern on the piano.
These patterns are REALLY easy. Another cool thing you can do with this technique is to try playing the 5ths as broken intervals. Piano Accompaniment Styles for 50 Great Songs Part 1 Rather than focus on just one song this 2-part tutorial is going to help you play a wide variety of songs.
To make it sound even more impressive do something a little different on beat 3. See what you can come up with and take your piano playing to the next level. Accompaniment Pattern 2 - Off Beat.
The notes in an arpeggio arp spell out the tones of the chord in an ordered rhythmic fashion. Between 2 3 is a whole step. Just like the piano in Coldplays Clocks Beethovens Moonlight Sonata or the dark synth sounds of Stranger Things.
Pro Piano Accompaniment Techniques Step 1. Play the fifth of the chord by itself but one octave Lower. Between 4 5 is a whole step.
This pattern will work with any left hand chord. Lets take a look. Accompaniment Pattern 3 - Off Beat.
Chordal styles - How to break down chords and combine chordal notes to make the accompaniment interesting. Patterns are one of the most fundamental ingredients of music and so students with a solid pattern vocabulary will be much better as both readers and players.
On the old Compaq SLT the Fn function key is located in the lower-left corner enclosed in a rectangle. Although this shortcut is pretty much handy not all laptops come with the Fn lock key notice the Fn lock icon or lockunlock symbol on the F1 F2 keys or Esc key.
 4 Ways To Disable The Function Key Wikihow
On laptop computers the Fn key is usually on the bottom-left side of the keyboard next to the Ctrl key.
Where is the fn key on a laptop. Generally it has icon icons on keys from F1 to F12 if. Each laptop model is likely to have a different combination required to change system settings. Heres what you have to do.
There are also some functions that can only be performed by fn key such as fnf5 to refresh fnf2 to rename a file or folder etc. Not all keyboards have an Fn key lock. You can generally find it on the bottom left side of your keyboard between the Ctrl Alt and Windows key.
How to configure the Function Fn keys to not require use of the Fn key in Windows 81 Windows 10. Jika opsi ini dipilih tombol Fn di papan tik Anda akan dinonaktifkan kecuali fungsi istimewa yang tercetak di setiap tombol F Anda. Other keys with rectangles are activated when theyre pressed with the Fn key.
What is fn Key on Laptop. The BIOS or UEFI Settings can be used to enable or disable the Fn key. Lets start enabling Function Keys on the Windows 10 machine.
On laptops fn key is used as compact layout to combine the keys which are separated to each other. Most laptops have a Fn key on the keyboard which can change the behavior of function keys F1 F12. For example on the DELL computer that I am using the key Fn F1 is mute key Fn F2 volume down Fn F3 is to increase the volume.
Anda dapat menemukan opsi ini di bagian bawah menu Keyboard. From there click System Configuration then Function Key Behavior. Many laptops place the Fn key at a less convenient position and with a smaller size within the top row of functions keys F1 to F12 and other multimedia or manufacturer-specific devicepower control key.
This is purely subject to the make of a keyboard and is not something to do with drivers or a Windows 10 feature. It is a kind of modifier key on many laptops keyboards such as Dell HP HCL Lenovo etc. The Function or Fn key is used by HP and other computer manufacturers on compact keyboards such as laptop keyboards.
Beri tanda centang pada kotak Use F1 F2 etc keys as standard function keys. You can enter the BIOS on your laptop by pressing a particular key when you power on your laptop and enter the boot screen. Keys Fn often used in combination with the keys F1 F12 on the Laptop keyboard and some Laptop models the Fn key also combined with a few other keys.
With laptops you will usually find the key on the bottom row of the keys on your keyboard in between the Ctrl key and the Windows key. For example if youre using a Lenovo ThinkPad the Esc key says FnLk at the bottom which means that youll use the Esc key as the function lock key. The fn key on laptops is defined as Function Key.
The Fn Lock usually displays a small lock icon and the letter Fn It may be shared with another key such as Esc or Shift. In this blog Ill guide you on how you can enable Function Keys Fn on Dell or laptop. So the arrow keys in the lower-right corner double as other cursor-movement keys.
Once you find it press the Fn. On some keyboards press the fn key to enable that command. Sometime function keys are important than Secondary Keys such as Voice Brightness and Volume.
You will usually find it abbreviated to Fn. Switch to Fuction Key First then hit the Apply box then Exit. Similar to other modifier keys like a Shift key the Fn key allows you to access the second assignment of a key.
The secondary functionality is sometimes called action keys mode or hotkeys. Find the Fn Lock key on your keyboard. The Fn lock key is usually the Escape key and it will have a padlock on it see image below.
If I accidentally activate the Action Keys Hotkeys mode then F2 will lower volume and I have to press Fn F2 for renaming files. The boot screen is the screen where you see the Logo of your laptop manufacturer. Keyboard function keys f1 through f12 often have a printed icon that indicates a secondary action such as muting sound or adjusting display brightness.
As the system in booting hit F2 to go to Setup. The Fn key and the Fn lock key. The Fn key lock is enabled by holding down two keys.
The purpose of the Function key is to combine two keys together and thus save space on the keyboard. This is a very common issue when you buy new laptops or settings that are disabled. Fn is an abbreviation for function.
The Fn key works in the same manner as the Shift key it must be pressed and held as another key is pressed. Now the function keys will work normaly and you can hold Fn to use the multimedia fuctions. On my laptop the default function of F2 is to rename files while pressing Fn F2 will lower volume.
The first step is to enter the BIOS Setup of your laptop.