In this episode we show you how to master the clone stamp tool in Photoshop. Cloning in Photoshop - Sampling To remove items seamlessly and convincingly you need to take your samples for cloning from areas directly surrounding the item you wish to remove.
 How To Use Clone Stamp Tool In Photoshop Cs6 Youtube
The Importance of the Clone Stamp Tool.
Using clone tool in photoshop. Using the clone stamp tool designers and creators of all levels of proficiency can copy and hide objects using pixels with ease. Clone only a specific portion of the photo by using a new layer. To use the Clone Stamp tool click and hold the rubber stamp icon in the toolbox and select Clone Stamp Tool in the flyout menu.
While its activated the icon is blue. Open an image File ext jpg png bmp and apply the Clone Stamp tool from toolbox. The simplest method for replacing image content is to paint with one of the Clone tools.
Clone Stamp acts more like a correction tool for images. How to Use the Photoshop Clone Tool. I did the cover image with it.
Open an image in Photoshop. The distance between the two points is adjustable and you must take care to keep from repeating the same information as you brush along. You can use this tool to correct any flaws in the image.
We waited in the blazing sun outside the East Portal of Colorados Moffat Tunnel at. Alt-click a spot in the new layer and then select the layer that you want cloned. Finally it is time to learn how to use the Photoshop Clone Tool.
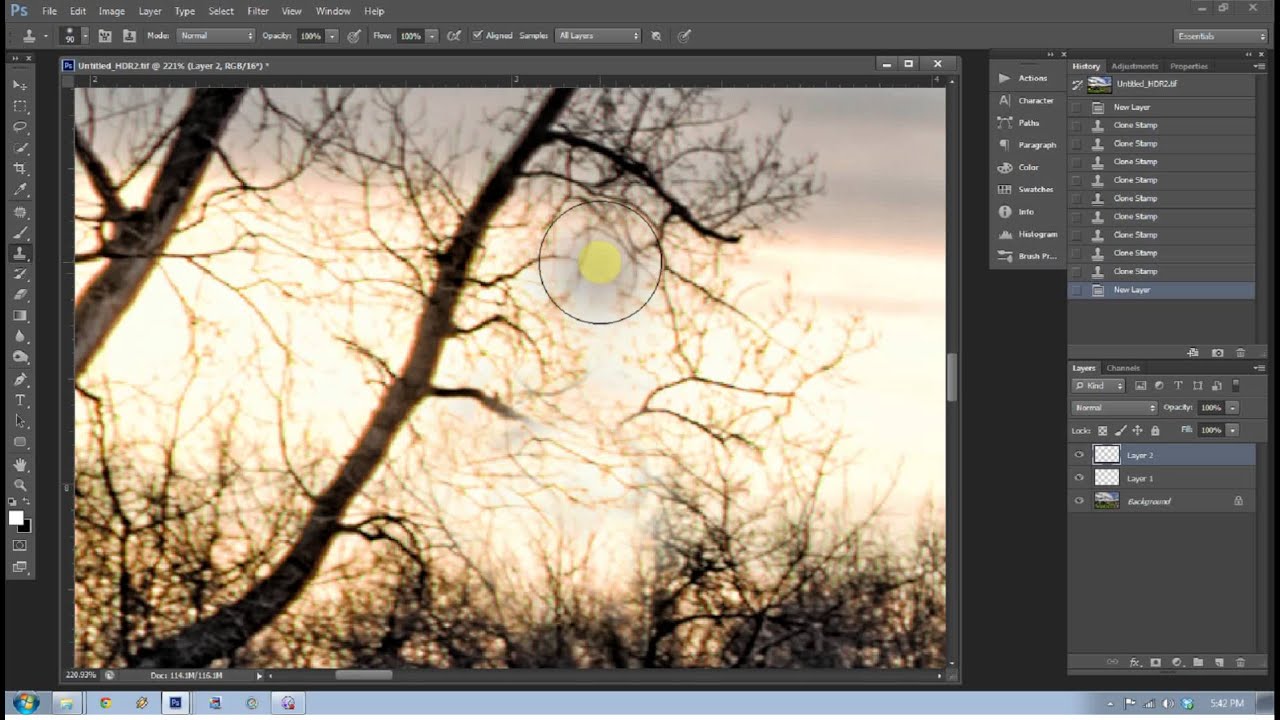
If you cant see the tool bar on the left make it visible using the Window menu. Work along with me and practice using the Clone Stamp. Today we show you how to remove anything from a photo with the Clone Stamp Tool in Photoshop.
Click on the keyboards S key. In general the Clone tools that are found in the Tools panel. The Clone Stamp Tool is one of the most important Tools that Photoshop has to offer.
You can paint over an unsightly spot or blemish using a similar sample from another part of the image. You can adjust the brush size and shape opacity flow and blending modes in the tool options bar at the top of the workspace. Firstly access the Clone Stamp.
Click on Tools all the way down in the menu. Use the Lasso Tool Quick Selection Tool or the Magic Wand Tool to select an area of the photo. You can find the clone stamp in the tool bar on the left hand side.
The Clone tool Figure 3-29 basically uses two points. Position the cursor over the area where you want to paint the cloned pixels and then start painting. Its very useful in retouching photos.
1 st of all you need to select Clone Stamp Tool and after that you are required to position the cursor over the area which you need to clone. To sample from another area tap the Sample Source tool again and then. The shortcut for the clone stamp for both Mac OS and Windows is S.
Follow along and learn how to setup the Clone Stamp Tool to. Tap the Sample Source tool to activate it. One point reads the image information and the other point writes that information.
This will keep in with the general look and feel of the image and make the alterations invisible. With the Clone Stamp tool selected position the cursor over the area you want to clone and then Alt-click Windows or Option-click Mac to define the clone source. This is how you tell Photoshop where to copy image detail from when you use the Clone Stamp.
Adjusting the Clone tool brush size adjusts the size of the read and write points. You can take a piece of the background for instance of a tree and clone stamps it in front of the tree. Where to Find the Clone Stamp Tool in Photoshop.
It allows you to copy areas of an image and i very useful for getting rid of Distractions or Skin blemishes. Using a combination of components and steps featuring a destination a source and a brush you too can master the clone stamp tool. How to Use the Clone Stamp Tool in Photoshop.
The Clone Stamp Tool can also be used for removing any portion from the imageYou can also learn about How to Rasterize Text on Photoshop. The Photoshop clone stamp tool simply allows you to duplicate a picture or even just a part of an image. In Photoshop the clone stamp tool is used to sample a part of an image and then use that sample to paint over another section of an image.
Press Ctrl-C to copy the selection and Ctrl-V to paste that selection into a new layer. Continuous clicking might even hide the tree from the front and show just the background in the image because of the clone stamp. With the tool active tap on an area of the image you want to copy.
Steps to Use the Clone Stamp Tool in Photoshop Step 1. Note the cross hair at the original sampled area. The Clone Tool or Stamp was the first tool I ever used in Photoshop Elements 20.
A small crosshair appears as you are retouching to show you where the detail is being copied from. Now you can use the Clone Stamp to brush over the area you want to retouch. To access the Clone Stamp use the keyboard shortcut S or select it from the toolbar.
In order to use Clone Stamp Tool you need to follow these steps. The simplest method for replacing image content is to paint with one of the Clone tools. In summer 2006 I had exactly one frame of film left in my camera oops and no more in the bag.
Wednesday February 17 2021.
Here is one of many tutorials available on how to use the tools http. Look for the Bucket Fill tool in your Tools panel.
 How To Blend Colors In Photoshop With Pictures Wikihow
This depends both on your personal preference and style as well as what you are trying to achieve.

Blending tool in photoshop. Use the Eyedropper Tool now to. For more tutorials on blending please check out the exposure blending resource page. So whether youre looking to blend multiple exposures from the same place and time or composite images replace skies.
Access Photoshops Blending Options We need to access Photoshops Blending Options next and theres a couple of different ways to do that. The result color is the color resulting from the blend. Heres how to use the Mixer Brush tool.
Click and hold until tool options appear. The Basics Step 1. To load color into your reservoir Altclick Optionclick where you wish to sample that color.
I use most of the tools Photoshop offers but of course I have my favorites like the clone and eraser tools. I especially like using blending modes because of the interesting effects you can get with them. For everyone who think I talk WAY too much.
Blend If is an easy-to-use tool in Adobe Photoshop to help you blend your images or adjustments rapidly without any complicated steps. With the layer mask still active paint with black white or gray to refine the mask. Photoshop offers a number of tools you can use and it is up to you as an artist to decide how and when to use them.
Make a copy of the layer or area youre trying to adjust. With the original color still selected as a Foreground Color paint a small swatch next to it. Knowing how to effectively blend colors is arguably the most important aspect to digital painting.
You can even choose your default colors in RGB. By blending layers in a photo editing tool eg Photoshop likely using masks and opacity reductions to determine what will show and whether it completely obscures the image below. It allows you to blend either from shadows or highlights.
Press the letter V to quickly select the Move Tool. Like painting there is no one right way to blend. And a quick shortcut on your keyboard to get here would be the letter L as in Larry.
Other Blending Methods 1. You can also choose your desired Foreground color. Open the Brush Picker in the Options bar and drag the Hardness slider to the left.
The Blend If slider is essentially an easy-to-use blending tool that allows you to blend based off of information from the layer youre on or based off of information from the rest of the image. Thanks so much for reading my tutorial. Then press and hold your Shift key and use the plus and minus - keys to move up or down through the list.
Past it on a new layer above the. The blend color is the color being applied with the painting or editing tool. Its an underrated powerful tool that you should consider trying.
Select the Brush tool in the Toolbar. This lets you quickly try out the different blend modes to find the one that works best. And on this video were gonna be working with the Blending Tool otherwise known as the Gradient Tool.
The base color is the original color in the image. First pick one color from the Swatches panel and plant it on the canvas using the Brush Tool B at 100. You can cycle through Photoshops various blend modes directly from your keyboard.
Its also used by photographers doing architecture environmental portraits including wedding photographers. And here are the options that we have and frankly weve got quite a few different options. 572019 UPDATE Hey thanks for all the HUGE support for this video.
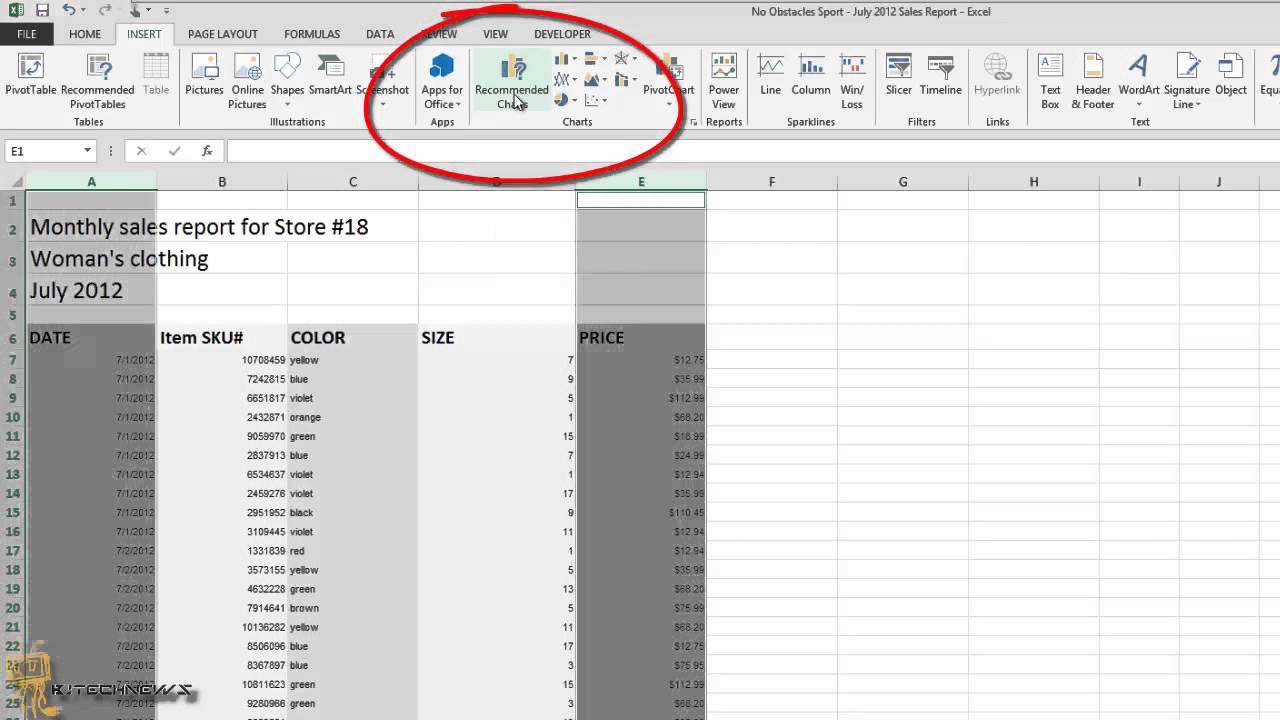
I absolutely love your comments and support. Select the Mixer Brush tool from the Tools panel. We could go up to the Layer menu at the top of the screen select Layer Style and then select Blending Options but theres a faster way.
Blending images in Photoshop is a popular technique used by landscape and travel photographers. Choose a brush from the Brush Presets panel. Try the gradient blend.
If you have two.
The button will open the Data Analysis dialog which offers access to a variety of analysis tools. Click the Quick Analysis button.
 Excel Data Analysis Quick Analysis Tutorialspoint
This feature works the same in Microsoft Excel 2013 and 2016.
Where is the quick analysis tool in excel. In the Add-Ins box check the Analysis ToolPak check box and then click OK. Select the Quick Analysis button that appears at the bottom right corner of the selected data. See Microsoft documentation for more information.
To access Quick Access tool select the cells that contain the data you want to analyze. Notice the Quick Analysis Tool icon that is displayed at the bottom of the data. But this option can be turned off.
When you select the data Excel shows you a small icon on the bottom right side and when you click on this icon it opens the quick analysis tool. Select a range of cells and click the Quick Analysis button. Use the Quick Analysis tool to convert your data quickly and easily into a chart or table.
To enable the Data Analysis tool in Excel go to the File menus Options tab. It allows you to click and browse through its options. Quick analysis tools in excel are the tools provided by Excel to quickly analyze any data rather than going the older method of inserting a chart or tables etc there are two ways to see this quick analysis tools select the cell range data which contains values and a yellow box appears on bottom right hand side which is the quick analysis tools or we can press CTRL Q for quick analysis tools.
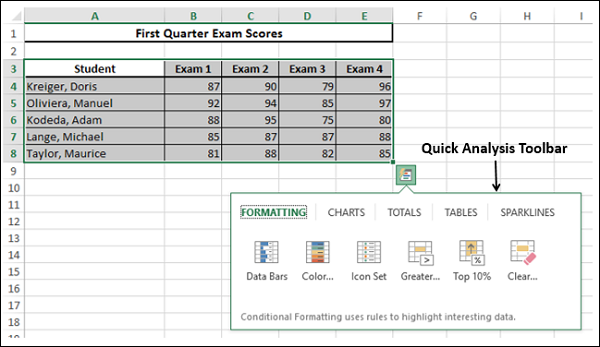
When you click it youll be able to choose from a variety of charts sparklines conditional formatting options and more. Excel 2016 365 2013 2010 When you select a range of data Excel displays a Quick Analysis button in the lower-right corner of the range. Where the Quick Analysis Tool is Located.
Use The Quick Analysis Shortcut. Excels Quick Analysis button lets you instantly create different types of charts including line and column charts or add miniature graphs called sparklines. Instructions provided courtesy of Excel Help.
Select a range of cells. Overview of Excel Quick Analysis. This will take us to the window from where we can select one or multiple Data analysis tool packs which can be seen in the Data menu tab.
The Quick Analysis toolbar appears with the options FORMATTING CHARTS TOTALS TABLES SPARKLINES. A range of analysis tools is now available to choose from. Quick Analysis button shows up in the lower-right bottom whenever you select a range of data on your Excel sheet.
To use the Quick Analysis tool all you have to do is select the worksheet tables cells and then click the Quick Analysis tool that automatically appears in the lower-right corner of the last selected cell. The Quick Analysis function helps you quickly format your data into a chart table summary formula sparkline or highlighted figures with just a few simple steps. The button to open the quick analysis tool is not listed anywhere on the Excel ribbon.
Be careful when selecting your data. When you do a palette of options from Formatting to Sparklines appears right beneath the tool. Use the Quick Analysis Button Select the cell range you want to summarize.
Select the cells of data that you want to analyze. Or you can turn it off if you dont want to display this tool. If Analysis ToolPak is not listed in the Add-Ins available box click Browse to locate it.
If we dont find the Quick Analysis tool at the bottom of the data we can turn it on by pressing Ctrl Q Figure 2 Setting up data for Quick Analysis In the Quick Analysis toolbar we will click on Formatting. It applies to Excel 2013 and Excel 2016. Excel is tremendous while doing the data analysis for this purpose only excel has various kinds of formulas tools visualization charts and many other kinds of stuff.
How to Use Quick Analysis Tools in Excel. However you must first activate the tool if it is not already turned on. Select the range A1D7 and add a column with a running total.
Instead of displaying a total row at the end of an Excel table use the Quick Analysis tool to quickly calculate totals. Once we get the Excel Options window from Add-Ins select any of the analysis pack lets say Analysis Toolpak and click on Go. Quick Analysis is a similar set of tools available in Excel 2013.
In Excel 2013 and later version when selecting a range of cells a Quick Analysis button is displayed in the lower-right corner of the range as below screenshot shown. How could you turn off or disable this feature in Excel. If youre using Excel for Mac in the file menu go to Tools Excel Add-ins.
Excel Quick Analysis Table of Contents Overview of Excel Quick Analysis. The Quick Analysis tool button appears at the bottom right of your selected data. So it is really easy to get started with the Quick Analysis tool.
We will find the Quick Analysis tool at the bottom of the data. Excel Quick Analysis Tools. Whenever you select a cell range the Quick Analysis button will appear in the lower-right corner of the selection.
For example click Totals and click Sum to sum the numbers in each column. Once you select a range of cells or an Excel data table the tool appears at the bottom right of your data set.