Right-click and select Unhide from the popup menu. Open your spreadsheet in Excel 2010.
 Ms Excel 2010 How To Unhide 1st Column Youtube
Now with all these columns selected right-click on the column header.

How to unhide column a in excel 2010. This will open a popup menu select the unhide option and the hidden columns will be visible. Unhide the first column or row in a worksheet To select the first hidden row or column on the worksheet do one of the following. Double-click the Excel document or double-click the Excel icon and then select the.
Hold down the Shift key while you click the letter above the. To select columns A-D including hidden columns B C click on header A and drag across to header D. You can also use the right-click context menu and the format options on the Home tab to hide or unhide individual rows and columns.
In this example column B is hidden. Open your Excel document. Select the column to the right and the column to the left of the hidden column.
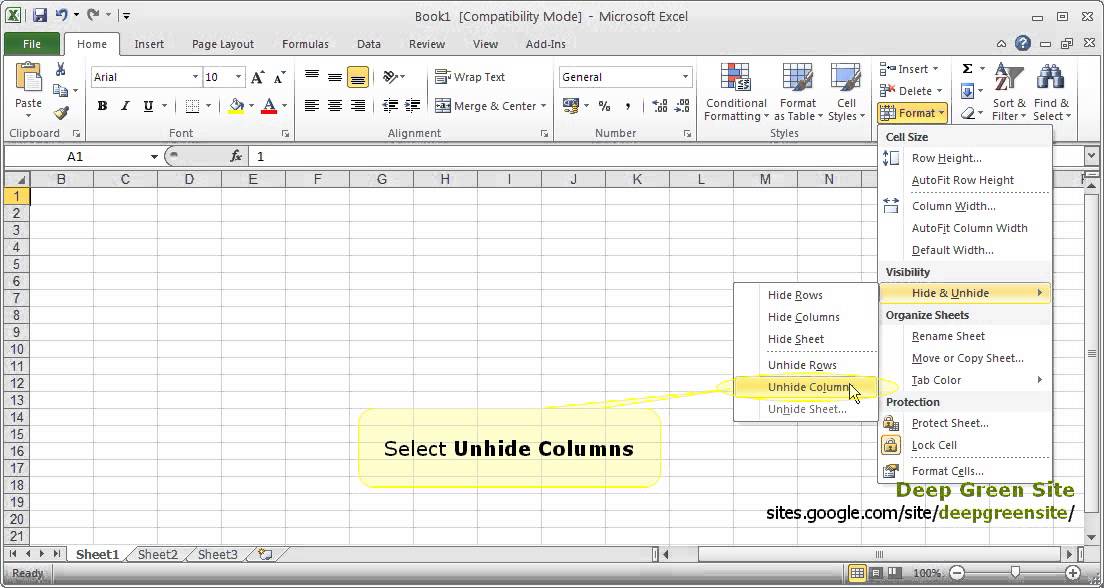
Select the Home tab from the toolbar at the top of the screen. From Cells group click Format button. Unhiding the First Column in Excel 2010 Step 1.
Type A1 into this field then press the Enter key on your keyboard. Hold the left mouse button and drag the cursor to the right. On the Home tab in the Editing group click Find Select.
Drag your mouse pointer to the left until you see the border change its color. Even when the first column is hidden Excel allows you to select it and drag it to make it visible. If you want to unhide rows or columns select the rows or columns both before and after the hidden rows or columns.
Actually Microsoft Excel has provided certain shortcut keys for hiding rows and columns in your spreadsheets. Unhide Columns in Excel Using the Shortcut. How do I unhide column A in a sheet in Microsoft Excel 2010.
Its in the upper-left side of. You can do this by either. Now from Hide Unhide options click Hide Rows.
Select the columns before and after the hidden columns like columns C and F in our example. Click column Bs header cell and drag the mouse pointer to the left. Press the Ctrl key while selecting multiple rows or columns.
Dont panic column A isnt gone forever and theres more than one way to unhide it. How to Unhide Columns in Excel Select the columns that you want to unhide. In the Name Box next to the formula bar type A1 and then press ENTER.
When the Go To window appears enter A1 in the Reference field and click on the OK button. 2 Click the Format button in the Cells group on the Home tab. In the Editing group click on the Find button and select Go To from the popup menu.
Whether your data is in a range or a table heres how to unhide columns or rows. 1 Select the column or row headings you want to hide. To hide multiple noncontiguous rows or.
Click the Home tab. How to unhide column A by selecting it Click on the header for column B to select it. Click inside the Name field at the top-left of the spreadsheet.
In desired spreadsheet select the rows for multiple non-contagious selection hold Ctrl key you want to hide and navigate to Home tab. Selecting the option Format from the Cells group of the Home tab on the Excel ribbon and from within the Format drop-down menu selecting Hide Unhide-Unhide Rows. In the Editing group click on the Find Select button and select Go To from the popup menu.
To hide a row or column you click the header to select the entire row or column right-click the selection and choose Hide from the resulting context menu. To see the hidden data unhide those columns or rows. In the Name Box next to the formula.
Upon click it will automatically hide the selected rows. These double lines mean that some columns and rows are hidden. Select a cell in the column to hide then press Ctrl0To unhide select an adjacent column and press CtrlShift0.
When the GoTo window appears enter A1 in the Reference field and click on the OK button. To do this hover the cursor on the left edge of column B or whatever is the leftmost visible column. Select the columns on both sides of the hidden column.
To unhide the first column select the Home tab from the toolbar at the top of the screen. When the pointer changes from the. Hover the mouse over column Bs header cell and move left.
Select a cell in the row you want to hide then press Ctrl9To unhide select an adjacent column and press CtrlShift9. It means column A is selected though you dont see it. The cursor would change into a double arrow pointer as shown below.
Dont click any borders just drag the selection. Now column B should no longer be hidden. Click the Home tab at the top of the window.
Thats all J The hide button will be displayed next to the last column above.
Hi For Collapsing all you may use Summary tasks filter through Project Filtered for Summary tasks. Compare Project 2010 and Project Online Professional Ready for Project Online Professional.

Select Set 0 - 100 complete.

Ms project 2010 expand all tasks. Open Task Information Window for current Task. I hope it helps. Microsoft Project 2010 is a project management solution designed to help develop schedules assign resources manage budgets analyze workloads and track progress.
In the Update Project dialog box choose Update work as complete through and then type or select the date through which you want progress updated. To display both the Phase and Deliverable sections of your project click the Outline pick list button and select the Level 2 item. To the left of each task list name there is either a - or a depending on the status of the list.
Click the View tab on the Ribbon click the Show Outline button in the Data group and then click Show Subtasks. If you want to update all tasks in the list you do not need to select the tasks. To expand or collapse all task lists at once click the options button three dots in the top right of your projects Tasks tab and select CollapseExpand All Task Lists from the dropdown.
You can follow any responses to this entry through the RSS 20 feed. In the sample project shown in Figure 4 this includes three summary tasks at Outline Level 1 the Phase sections four summary tasks at Outline Level 2 the Deliverable sections plus one milestone task. Alt Shift -Collapse Hide Subtasks Alt Shift Expand Show Subtasks Alt Shift Expand All Show All Subtasks.
With multiple tasks selected. How do you simply Expand All or Collapse All Tasks. You can leave a response or trackback from your own site.
Reduce a selection to a single field. Insert new Task at current Position. Select a drawing object.
Open a new window. The keyboard shortcut to automatically expand all tasks and subtasks in Microsoft Project 2010 is ALT SHIFT. You can then select everything again and click the expand button once again and it will expand another hierarchy level.
When filtering your project task for reporting you may. Open Assign Resources Window for current Task. If you select the whole project and click the expand button it will expand one level.
Display the Field Settings dialog box. On the View tab click Outline and then click All Subtasks. Microsoft Project displays all tasks at Outline Levels 1 and 2.
Display all filtered tasks or all filtered resources. To show or hide all subtasks for all summary tasks in Project in the View tab click Outline in the Data section and then click All Subtasks to show all the subtasks or click one of the Level options below it to show all the subtasks up to that level. On the View tab click Gantt Chart.
Reset sort order to ID order and turn off grouping. On the Project tab in the Status group choose Update Project. Click the heading of the Task Name column to select all tasks.
Click the View tab on the Ribbon click the Show Outline button in the Data group and click the level of the outline you want to reveal for the entire outline. To display hidden subtasks in a task view such as the Gantt Chart in Project 2010 follow these steps. I am looking to expand all of the project in as few clicks as possible and as efficiently as possible.
For Expanding all similarly use the filter of All tasks. This entry was posted on March 14 2013 at 234 pm and is filed under Uncategorized. Features include the Team Planner view Ribbon interface and more.